
Enterprise-grade, self-hosted platform for penetration testing teams to manage the entire security assessment lifecycle.
Executive Overview
Sectoria is an enterprise-grade, self-hosted platform purpose-built for penetration testing teams to manage the entire security assessment lifecycle — from importing scanner findings to delivering polished, client-ready reports.
Who Is Sectoria For?
Security Consultancies
Streamline client engagements, manage multiple projects simultaneously, and deliver branded reports.
Internal Security Teams
Centralize vulnerability tracking, maintain assessment history, and demonstrate compliance.
Enterprise Organizations
Scale security operations across teams and business units with full audit trails and RBAC.
Core Value Propositions
Focus on Testing, Not Documentation
Automate the tedious parts of report writing so your team can focus on finding vulnerabilities.
Professional Client Deliverables
Generate polished, client-branded reports in Word, HTML, or PDF format with a single click.
Complete Data Control
Deploy behind your firewall, in your private cloud, or in air-gapped environments. Your data never leaves your infrastructure.
AI-Powered Intelligence
Leverage local LLM integration to enrich findings with descriptions, remediation guidance, and compliance mappings.
The Problem We Solve
Security teams spend up to 40% of their time on documentation instead of actual testing. Sectoria eliminates these pain points:
| Pain Point | How Sectoria Solves It |
|---|---|
| Hours copy-pasting between scanners and Word | One-click scanner import with auto-mapping to your vulnerability database |
| Inconsistent formatting across team members | Template-driven reports ensure every deliverable looks professional |
| Manual vulnerability tracking in spreadsheets | Centralized vulnerability database with 6000+ pre-built findings |
| Scattered evidence across folders and emails | Integrated PoC editor with rich text and image upload per finding |
| Version control nightmares | Immutable report snapshots with full version history |
| Client data stored in third-party clouds | 100% self-hosted — deploy on-prem, private cloud, or air-gapped |
| No visibility into team workload | Real-time dashboard with capacity tracking and project health metrics |
Platform Architecture
Technology Stack
| Layer | Technology | Purpose |
|---|---|---|
| Frontend | React + TypeScript + Material-UI | Modern, responsive web interface |
| Backend | Python FastAPI | High-performance REST API (95+ endpoints) |
| Database | PostgreSQL 13+ | Reliable storage with JSONB & full-text search |
| Cache | Redis | Session management & real-time features |
| Real-Time | WebSockets (Socket.IO) | Live collaboration & notifications |
| Reports | python-docx + Jinja2 + WeasyPrint | Multi-format report generation |
| AI | Ollama / OpenAI (configurable) | Local or cloud LLM enrichment |
| Deployment | Docker + Docker Swarm | Containerized, scalable infrastructure |
Role-Based Access Control (RBAC)
| Capability | Administrator | Team Lead | Team Member |
|---|---|---|---|
| System configuration, migration & licensing | ✓ | — | — |
| User management | ✓ | Members only | — |
| Client & template management | ✓ | ✓ | View only |
| Vulnerability database (global feed) | ✓ | ✓ | View only |
| Methodology management | ✓ | ✓ | View only |
| Project creation | ✓ | ✓ | — |
| Access assigned projects | ✓ | ✓ | ✓ |
| Customize findings & generate reports | ✓ | ✓ | ✓ |
Getting Started
4.1 First-Time Setup
When Sectoria is deployed for the first time, an Administrator must complete the initial setup wizard.
- Navigate to your Sectoria instance URL (e.g.,
https://sectoria.yourcompany.com/setup) - The Setup Wizard appears automatically on first launch
- Provide Setup token and Create the initial Administrator account with full name, email, and strong password
- The system initializes the database and redirects to the login page
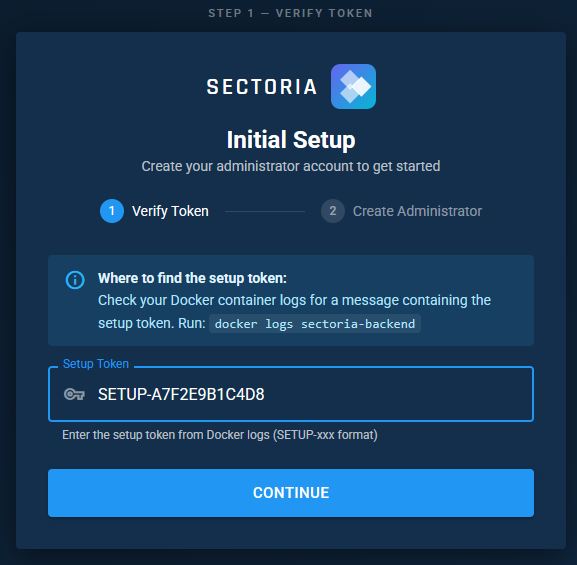
Step 1 — Verify Setup Token
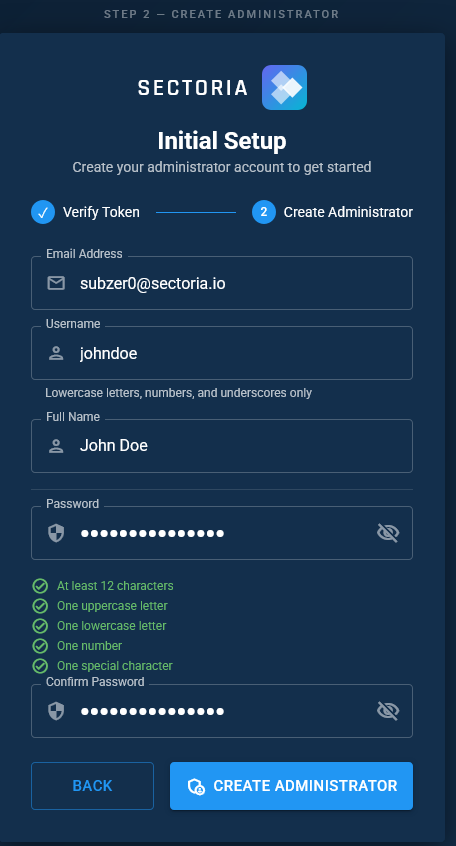
Step 2 — Create Administrator Account
4.2 Login & Authentication
- Enter your email and password
- If MFA is enforced by an administrator, the user will be prompted to set up an authenticator app after a successful login. The user must scan the QR code, verify with a 6-digit code from the app, and save the provided backup codes. Once configured, MFA cannot be disabled by the user — only an administrator can remove it.
- On subsequent logins, enter the 6-digit code from your authenticator app
- Optionally check "Remember Me" for persistent sessions
- Click Sign In to access the Dashboard
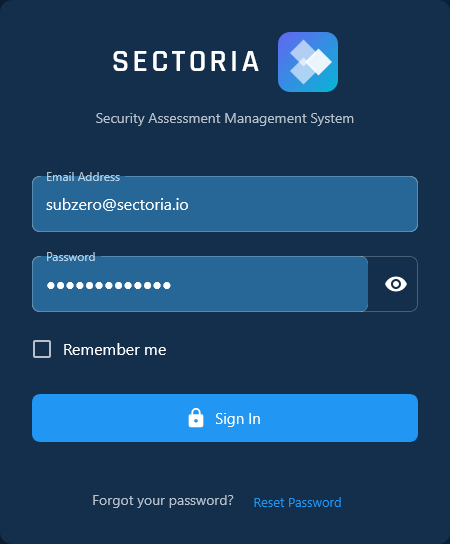
Step 1 — Email & Password
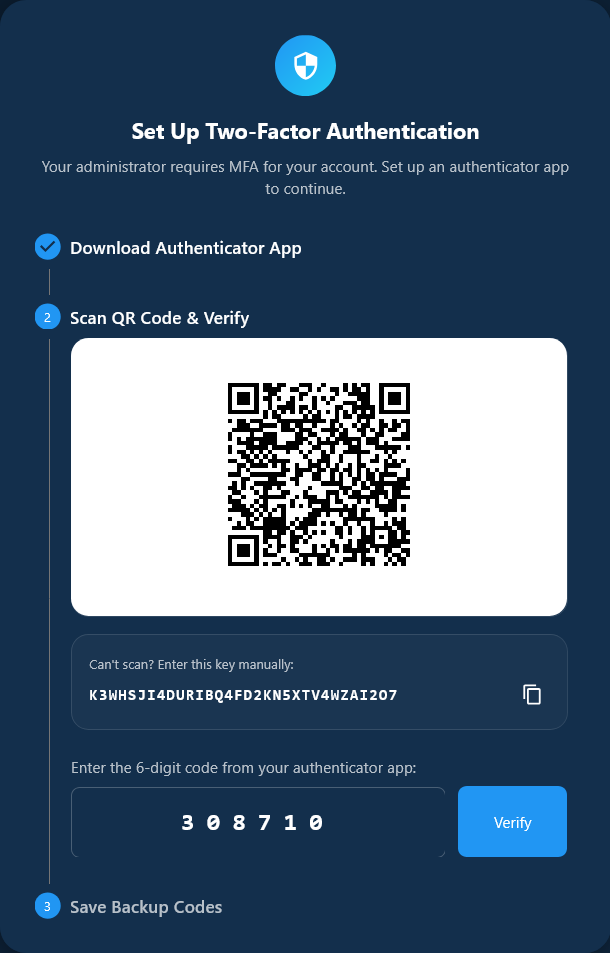
Step 2a — Scan QR Code
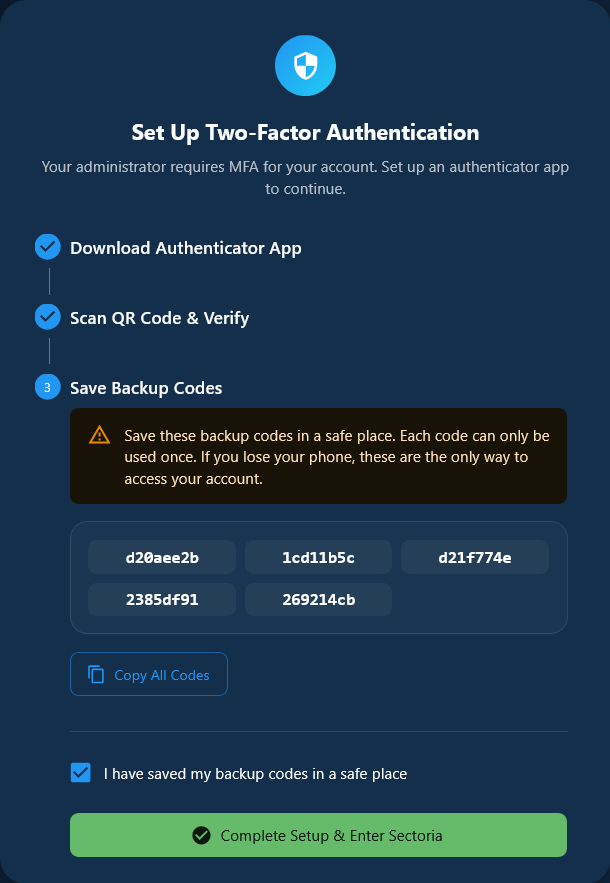
Step 2b — Save Backup Codes
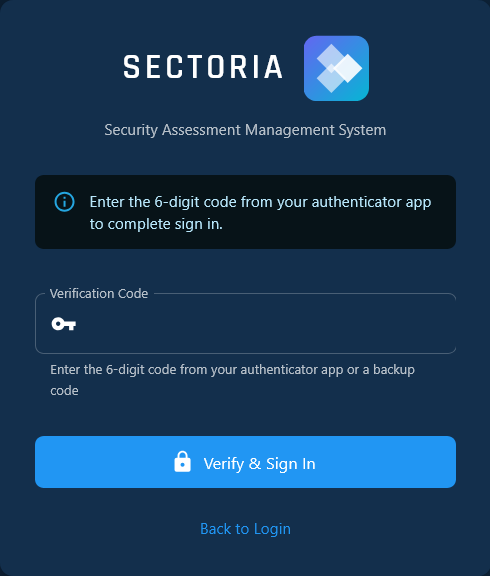
Step 3 — Login with Authenticator
Security Features at Login
Account lockout after 5 failed attempts (30-minute cooldown)
Session timeout (configurable, default 30 minutes)
Multi-Factor Authentication via TOTP apps (Google Authenticator, Authy)
Password complexity enforcement (12+ chars, mixed types)
Dashboard & Analytics
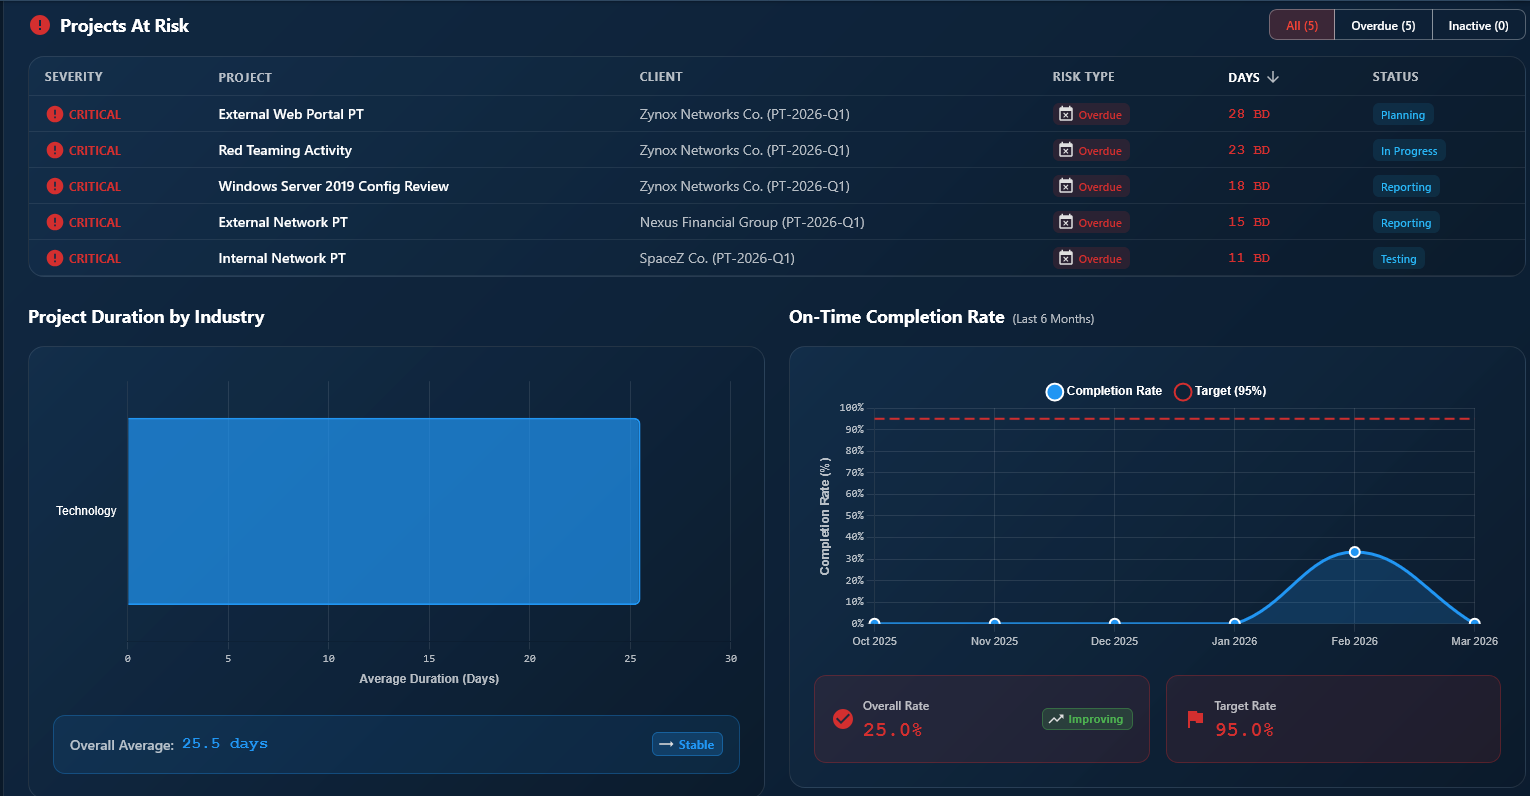
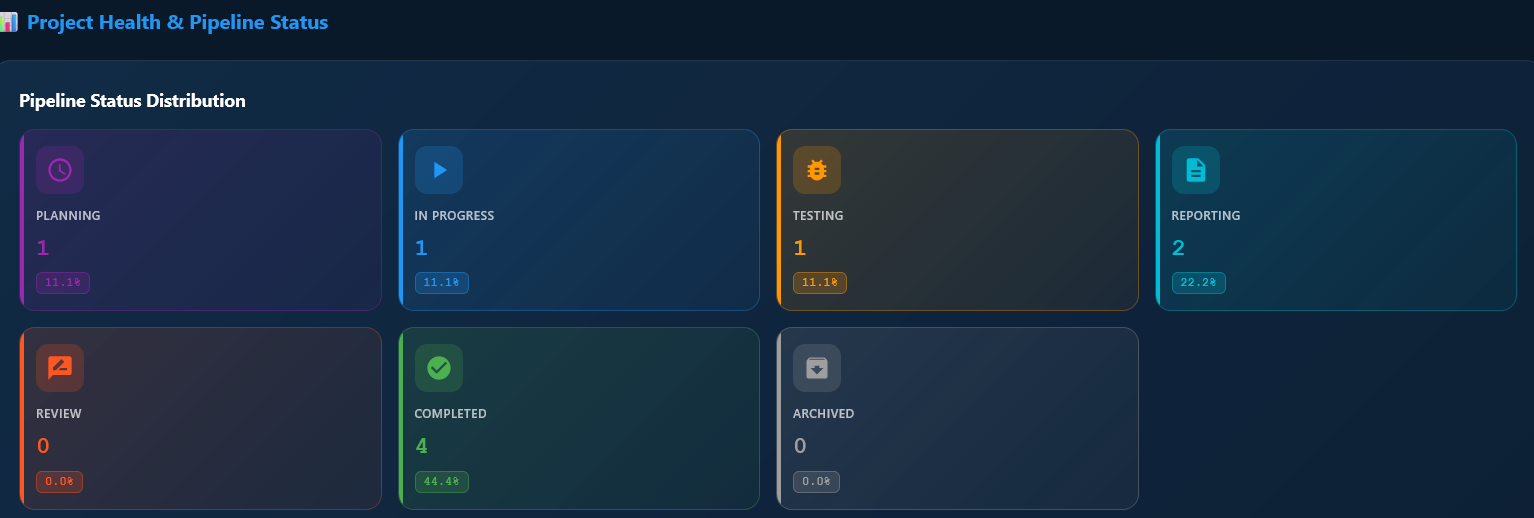
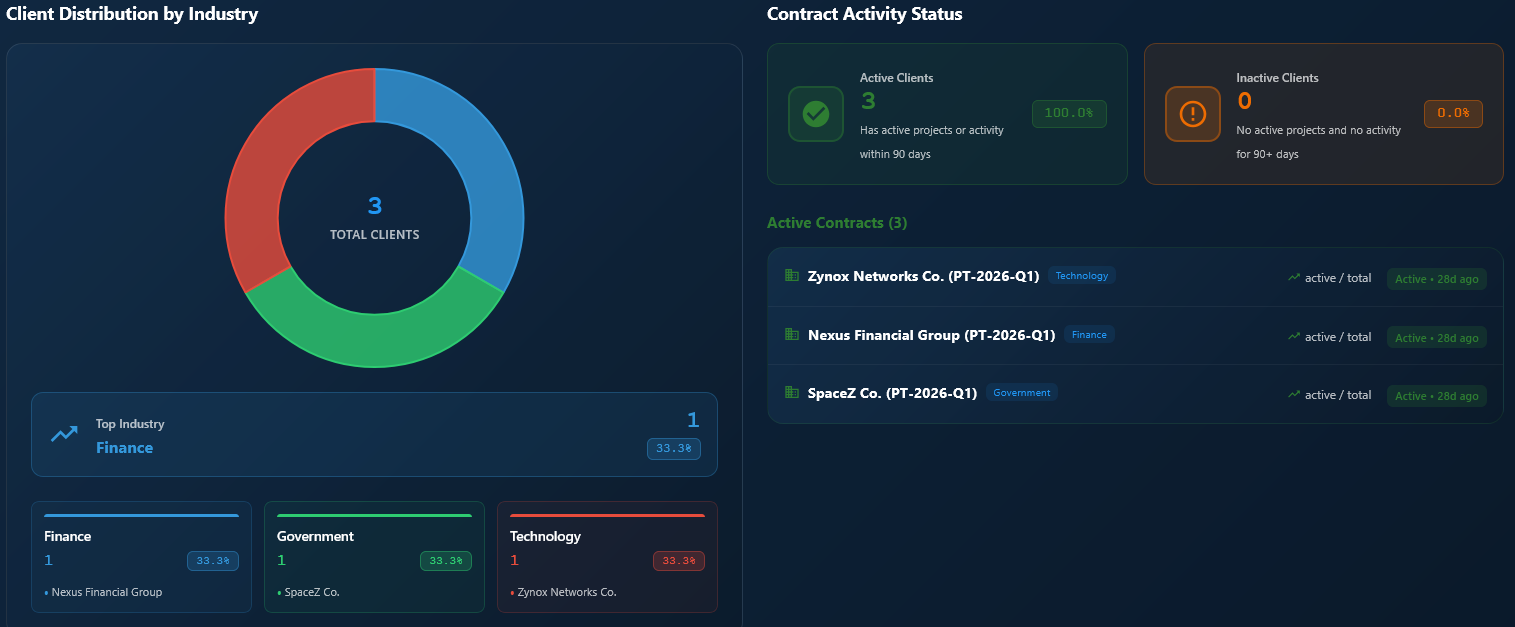
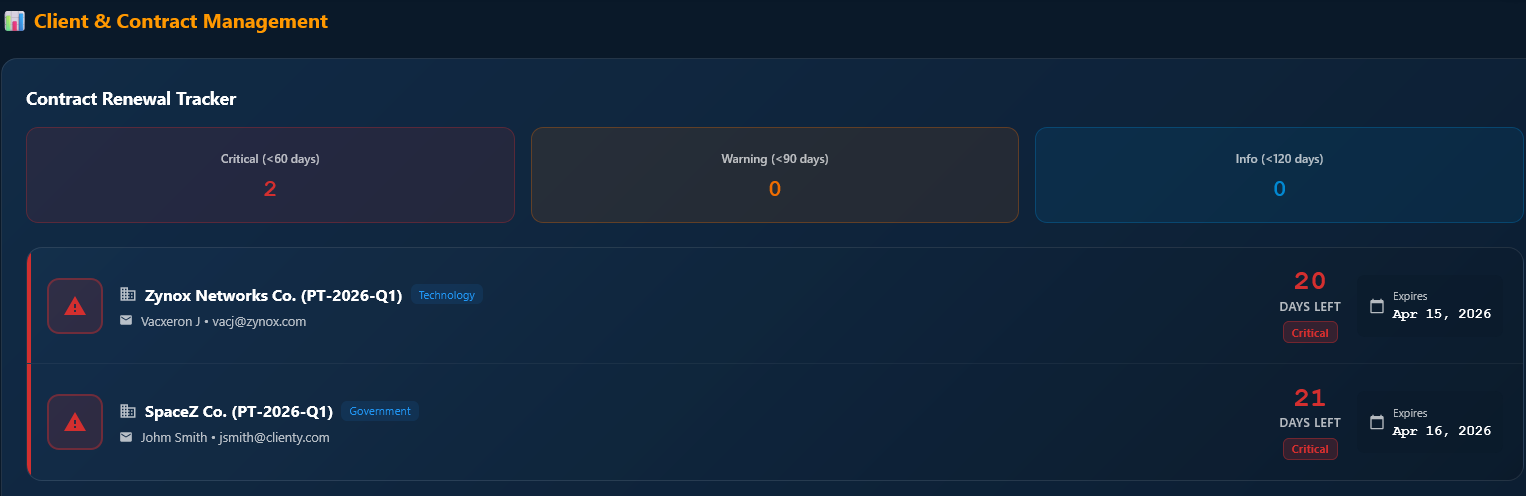
The Dashboard is the central command center, providing real-time visibility into your security operations across six analytical sections.
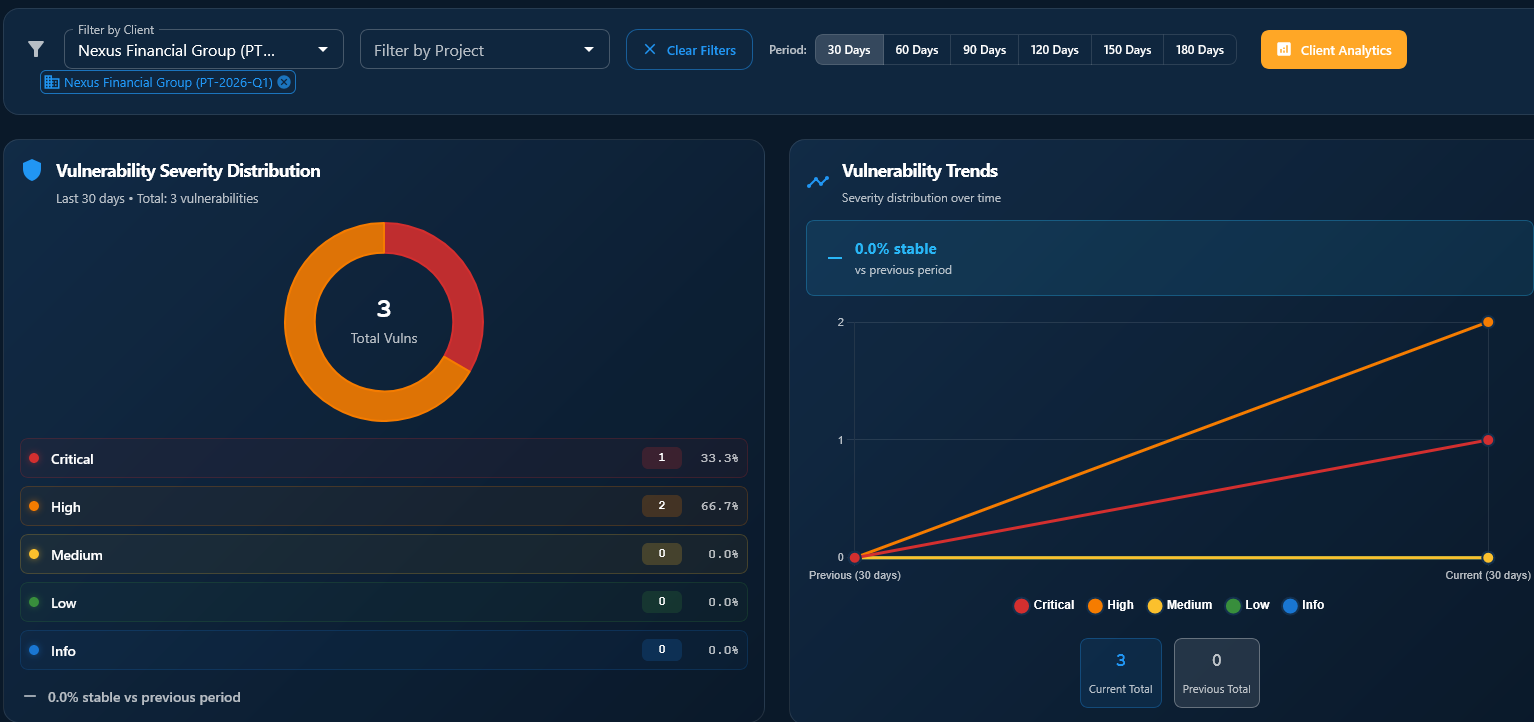
Vulnerability Intelligence
Severity distribution pie chart, vulnerability trends (30-180 days), top finding categories, and knowledge base statistics.
Project Health & Pipeline
Status breakdown across 6 stages, at-risk project detection (overdue/inactive), duration distribution, and team completion rates.
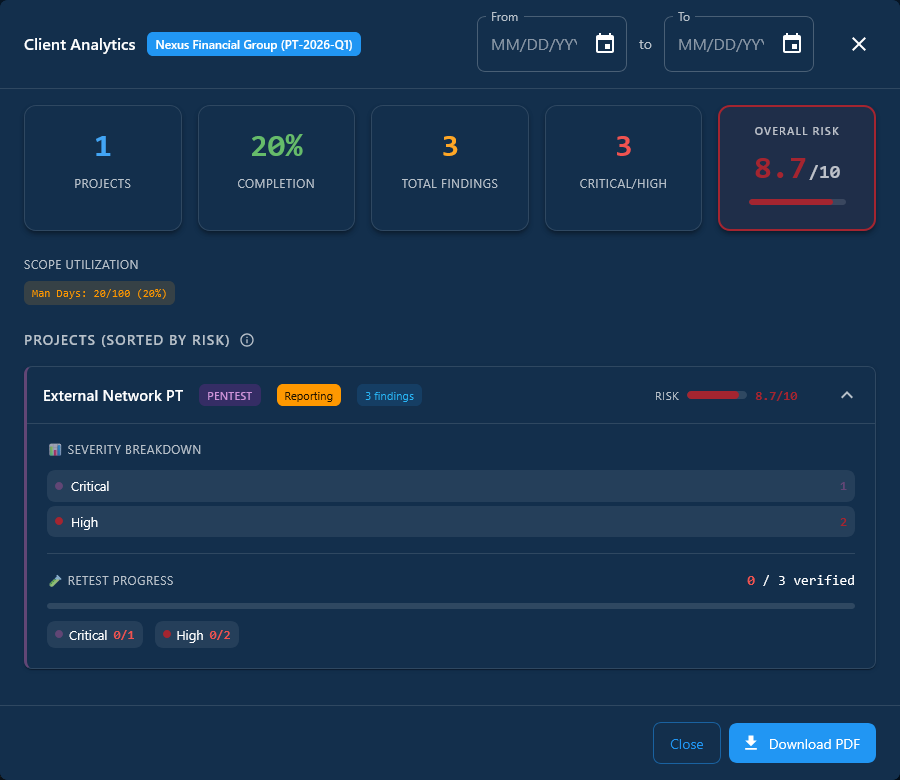
Client Analytics
Contract expiration tracker, industry distribution, client activity grid, and deep-dive analytics dialog with risk exposure metrics.
Team & Capacity
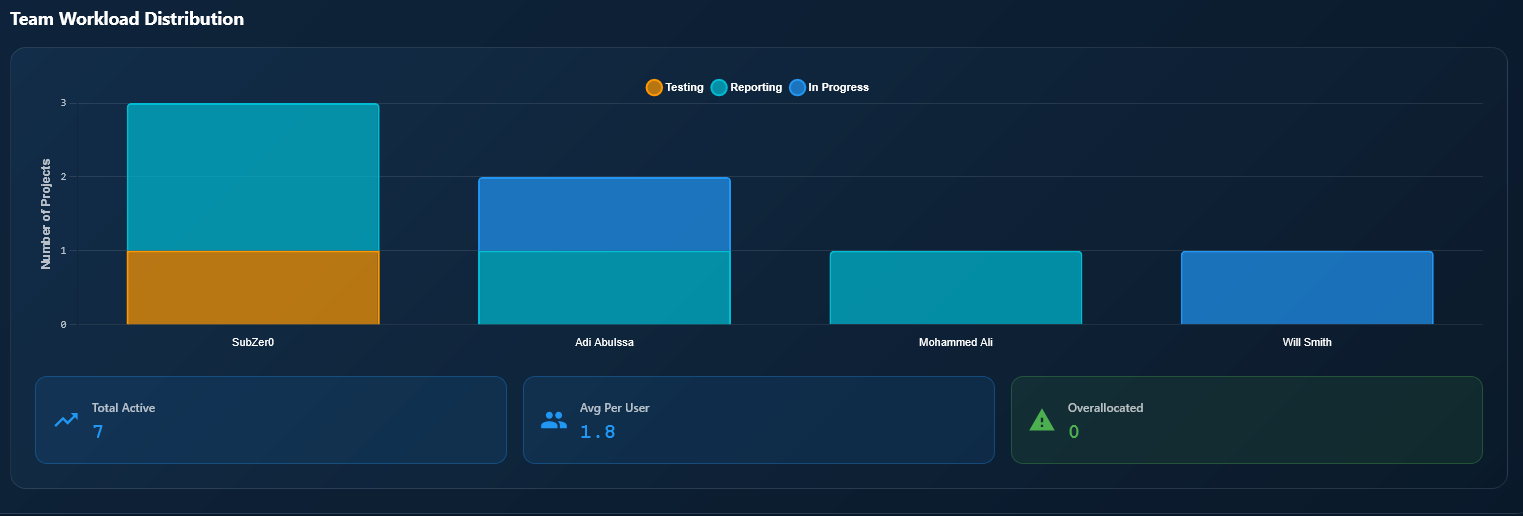
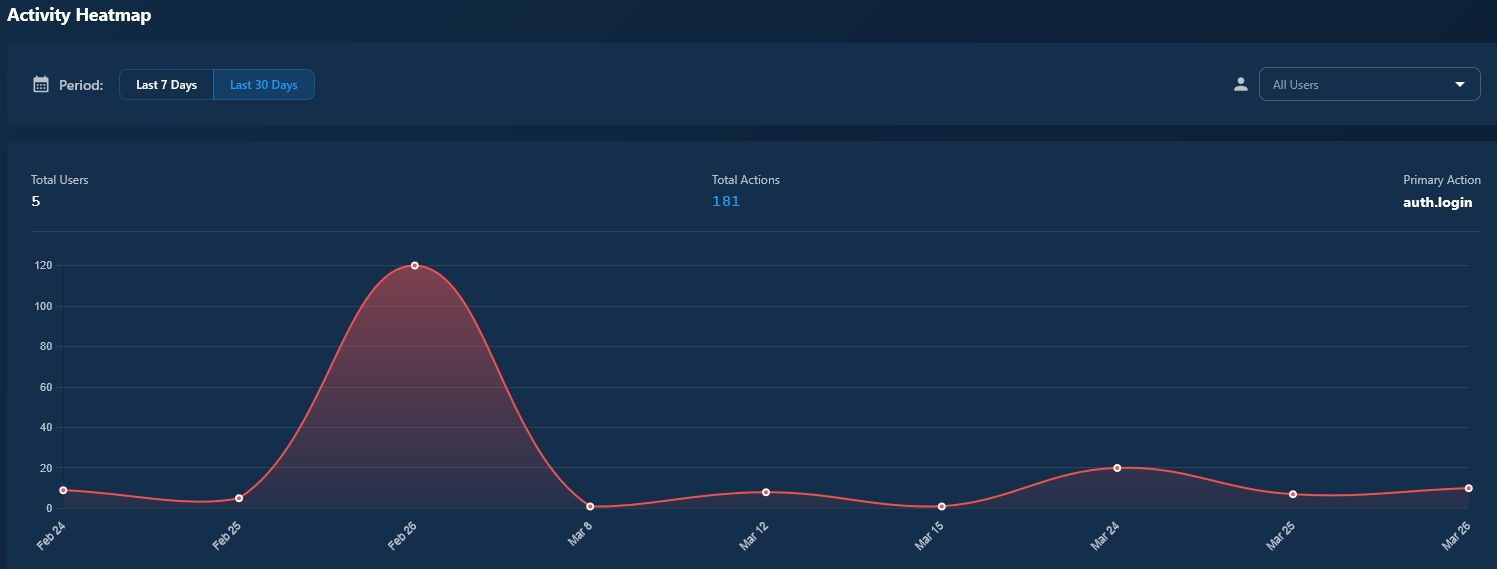
Top performers, workload distribution chart, 7/30-day activity heatmap, and real-time presence indicators.
Storage Management (Admin)
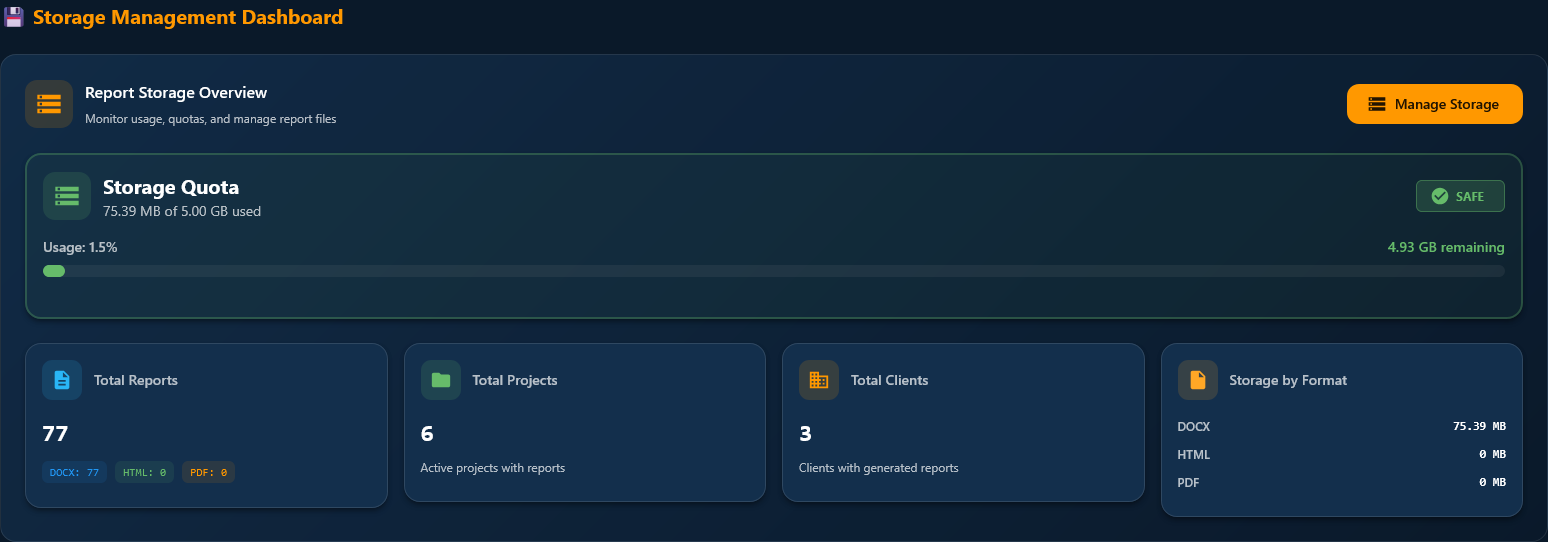
- Storage statistics — Used vs. available disk space with visual progress bar
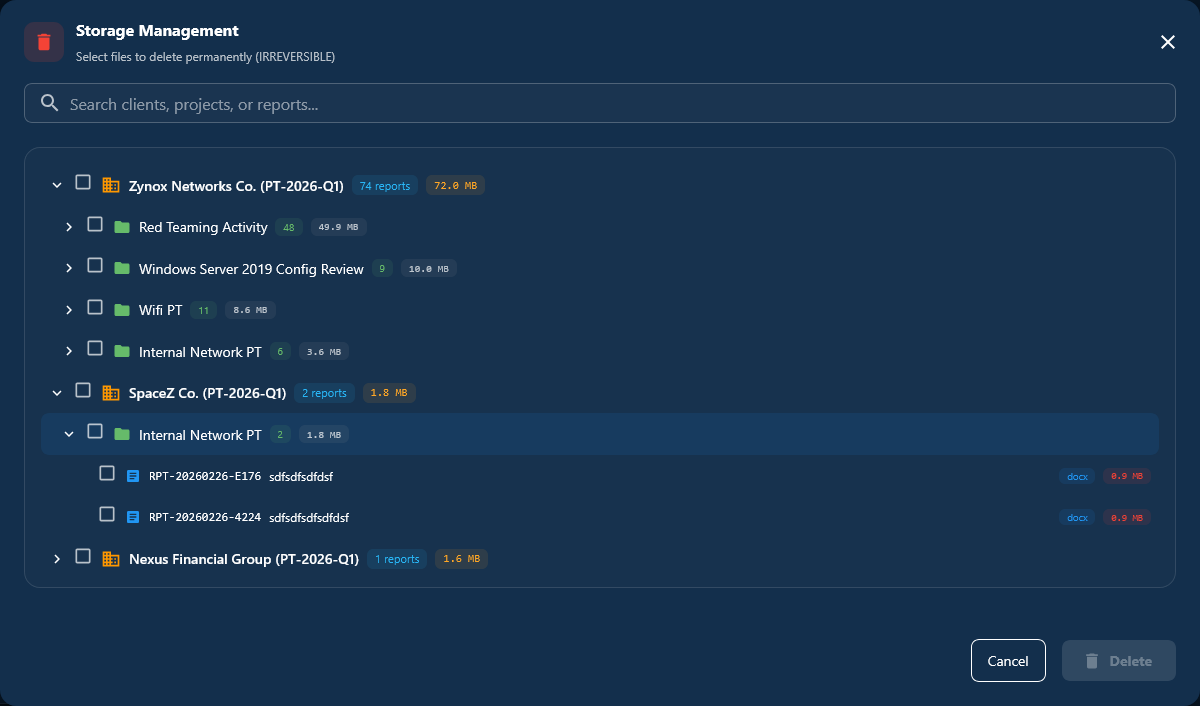
- Hierarchical tree view — Browse reports by Client → Project → Report
- Search & filter — Find reports by name, code, or format (DOCX/PDF/HTML)
- Bulk deletion — Select multiple reports with required audit reason
- Format icons — Color-coded: PDF, HTML, DOCX
Client Management
Manage your client portfolio with comprehensive profiles, scope tracking, and contract management across all industry sectors.
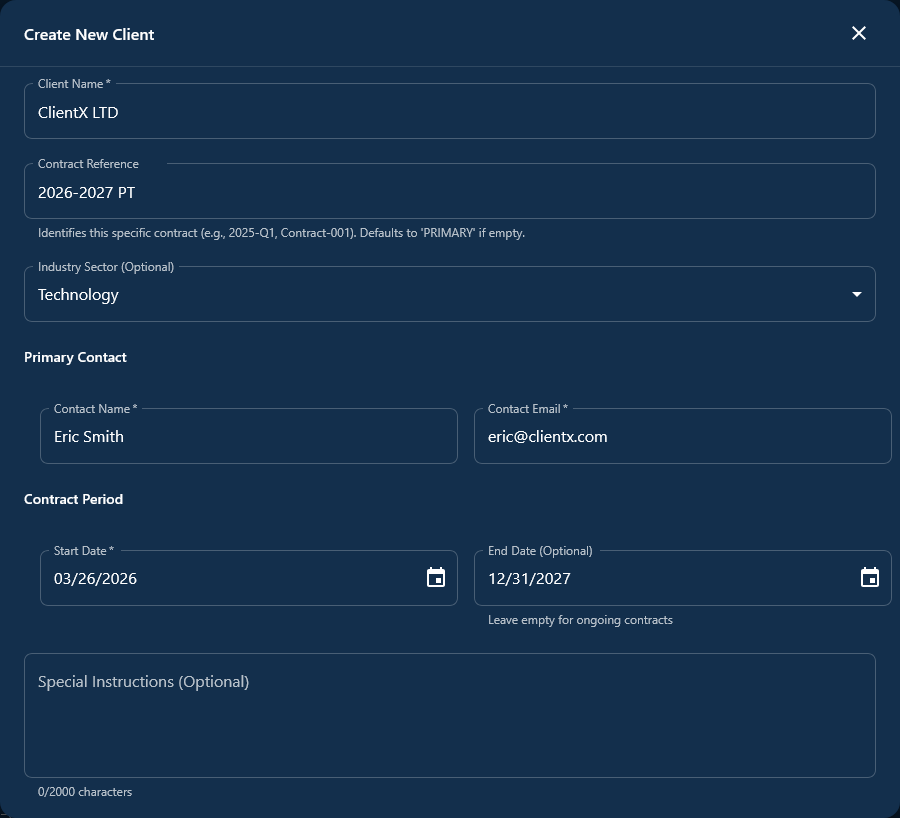
- Navigate to Clients from the sidebar
- Click + New Client
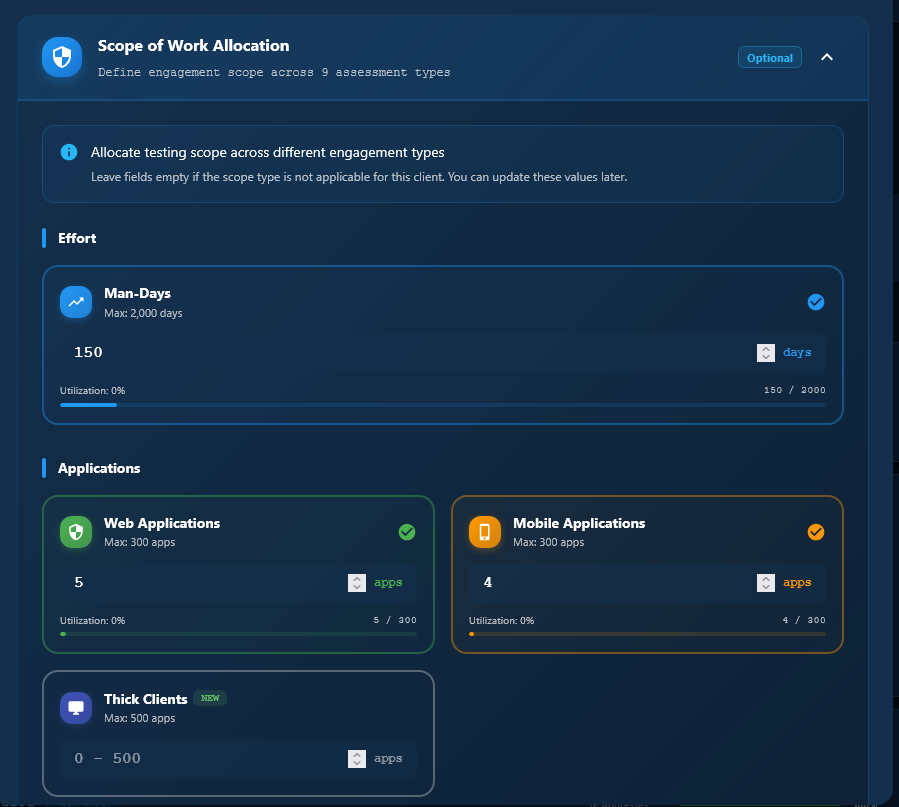
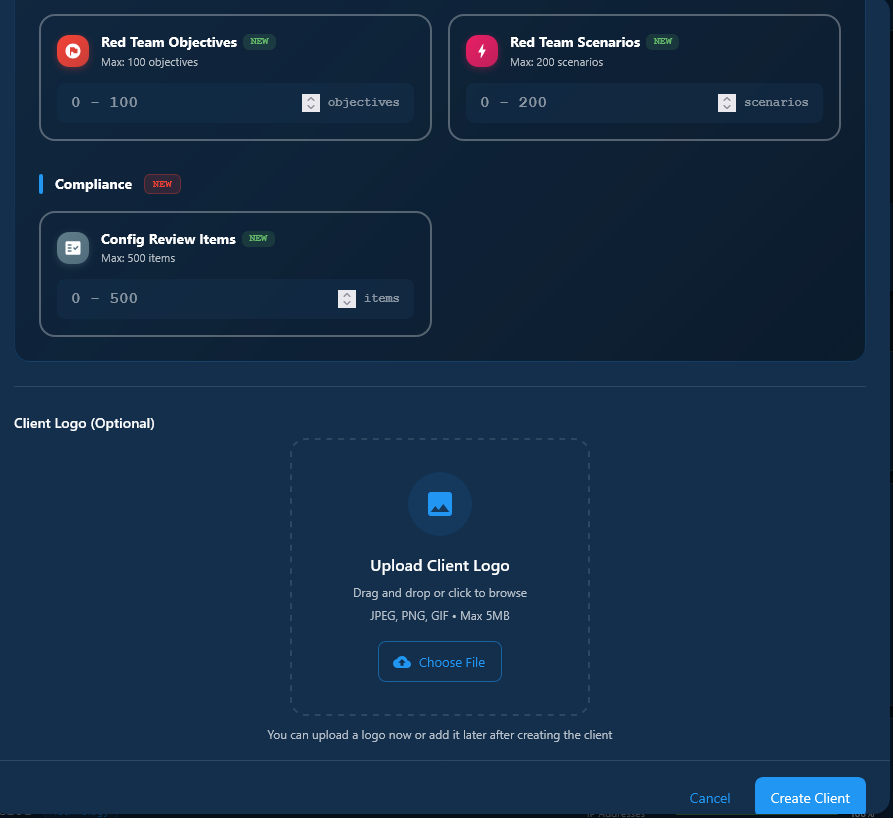
- Fill in: Client Name, Contract reference, Primary Contact (Name & Email), Industry Sector, Contract Dates, and scope of work
- Upload the client's logo (used in report generation and branding)
- Click Create — auto-generates code (e.g.,
CLT-20260316-0001)
Scope Management
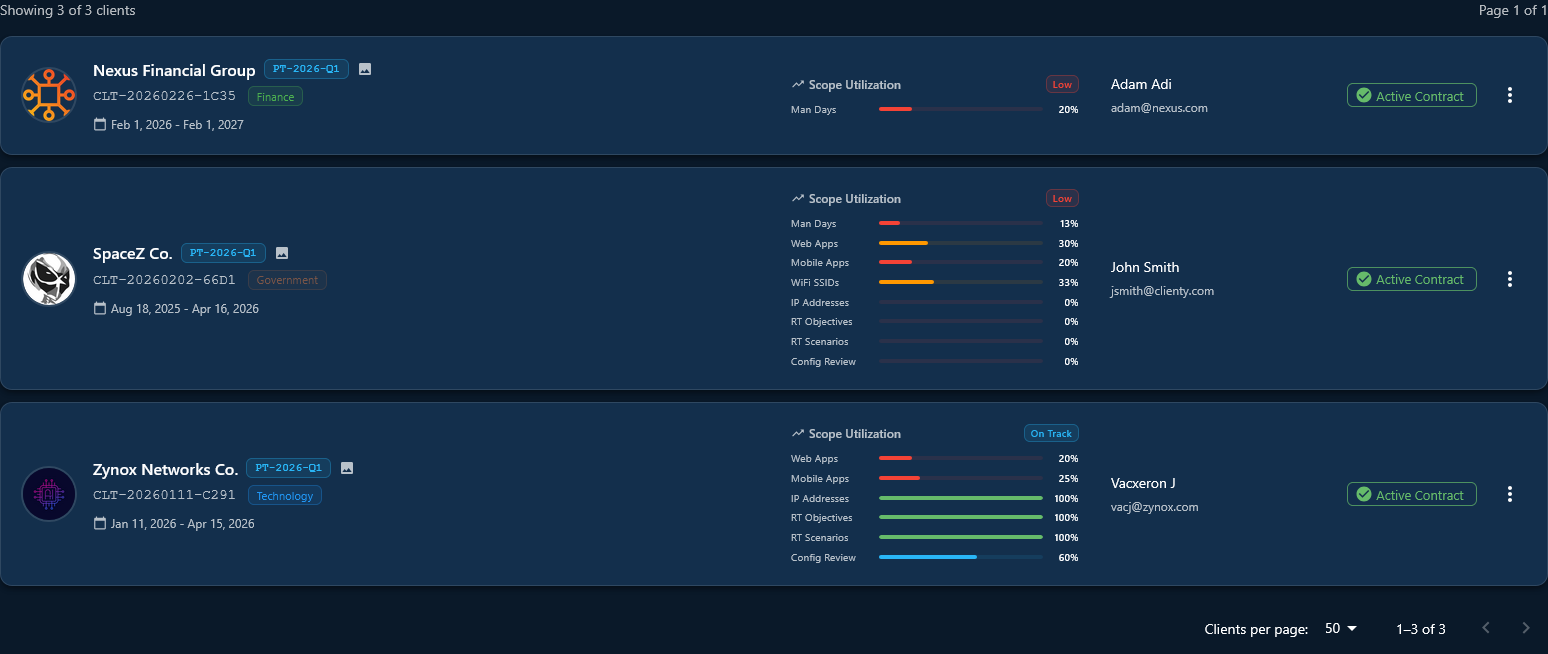
Each client has a detailed scope allocation panel tracking resource consumption per engagement type:
| Scope Category | Description |
|---|---|
| Man-days | Total allocated testing days per contract |
| Web Application Targets | Number of web apps in scope |
| Mobile Application Targets | iOS/Android apps in scope |
| WiFi SSIDs | Wireless networks to assess |
| IP Addresses | Network hosts in scope |
| Thick Client Applications | Desktop applications to test |
| Red Team Objectives/Scenarios | Red team engagement scope |
| Config Review Scope | Configuration review targets |
Per-project utilization shown with color-coded progress bars: red <25%, orange 25-50%, yellow 50-75%, green >75%.
Project Management
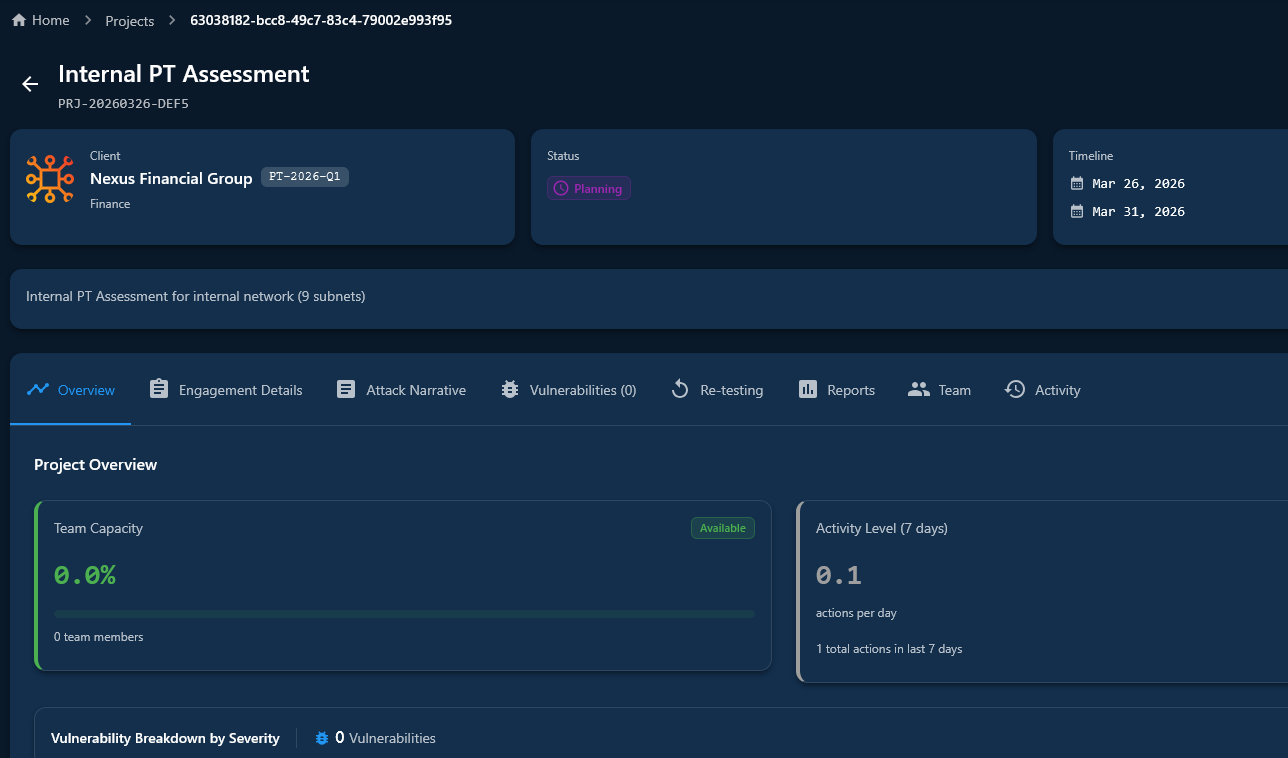
Projects are the core organizational unit, representing individual security assessment engagements with a defined lifecycle and 8-tab workspace.
Project Status Workflow
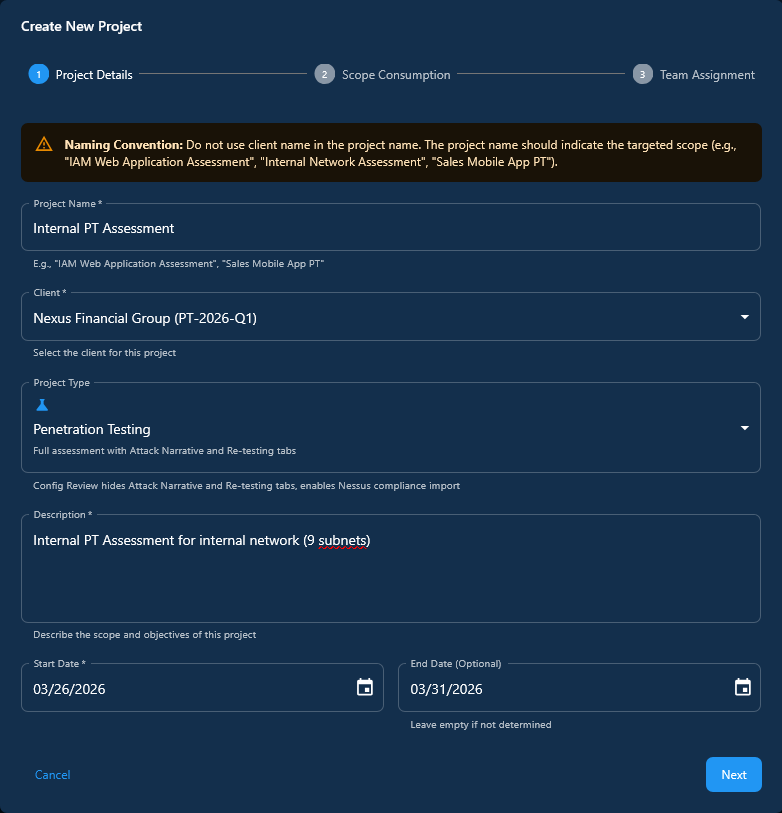
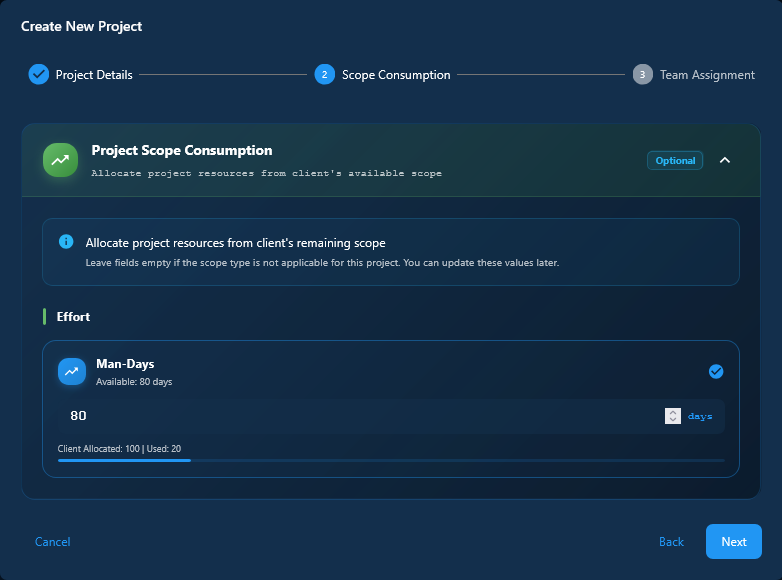
- Navigate to Projects → Click + New Project
- Select Client, enter Project Name, choose Type (Pentest / Config Review)
- Set Start/End Dates and optional description
- Set the scope items (if applicable) to be deducted from overall client scope
- Click Create — auto-generates code (e.g.,
PROJ-20260316-0001)
Project Workspace (8 Tabs)
Overview
Project summary, dates, team capacity ring visualization
Engagement Details
Executive Summary, Methodology, Testing approach, environment, and report compliance requirements
Project Vulnerabilities
Add, customize, and manage findings with PoC evidence
Attack Narrative
Optional narrative with scenarios and images
Re-testing
Remediation verification with pass/fail tracking
Reports
Generated report history with download & versioning
Team
Member assignments with Read-Write / Read-Only / Reviewer permissions
Activity
Real-time presence, comments, notifications, audit feed
Vulnerability Management
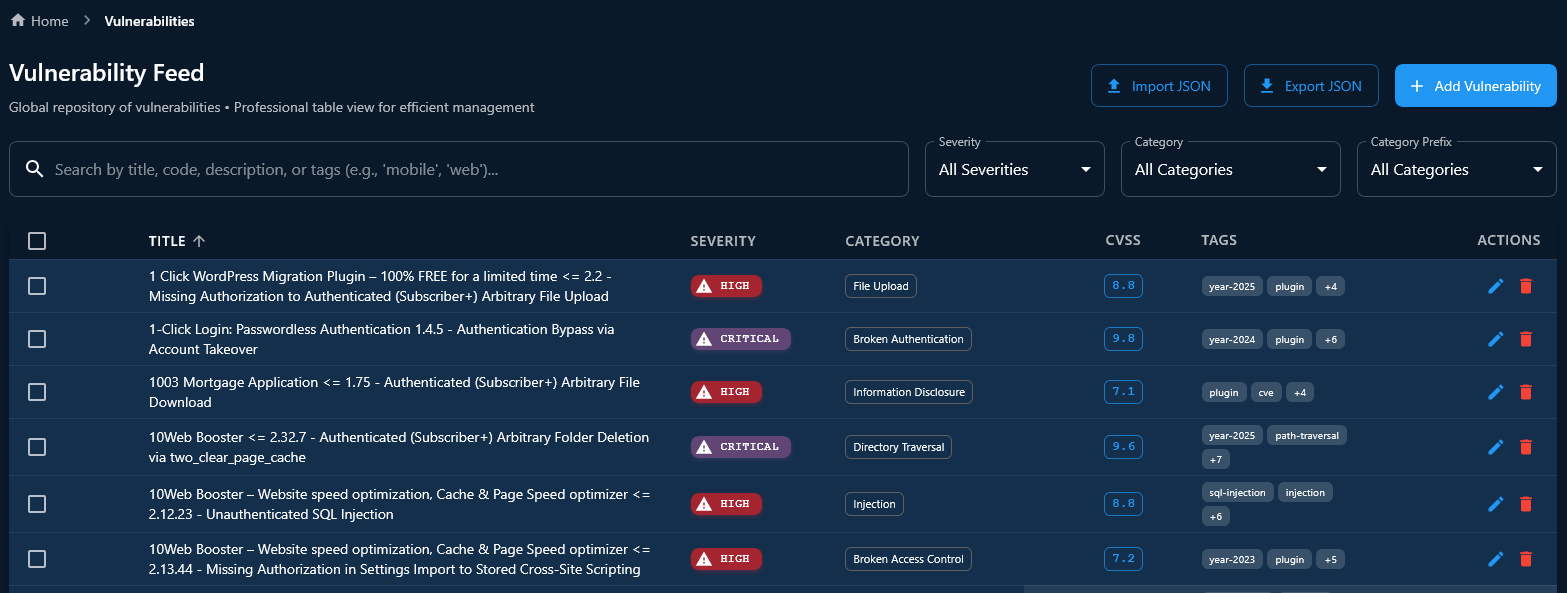
Sectoria maintains a centralized Vulnerability Feed — a global knowledge base serving as the single source of truth for your organization.
- Navigate to Vulnerabilities from the sidebar
- Browse the sortable table: Vulnerability Code, Title with CRITICAL HIGH MEDIUM LOW INFO badges, CVSS Score, Category, Tags
- Use filters: search by title, filter by severity, category (20+ OWASP-aligned), or source
- Click any row for full vulnerability details with smart color-coded indicators
Smart Color-Coded Indicators
| Field | Color Logic (Security-First Perspective) |
|---|---|
| Severity | Critical High Medium Low Info |
| Technical Impact | Critical=Red, High=Orange, Medium=Yellow, Low=Green |
| Ease of Identification | Very Easy/Easy=Red (dangerous), Moderate=Orange, Difficult/Very Difficult=Green (secure) |
| Ease of Exploitation | Very Easy/Easy=Red (dangerous), Moderate=Orange, Difficult/Very Difficult=Green (secure) |
Bulk Import & Export
Import (CSV / JSON)
- Upload CSV or JSON file with vulnerability data
- Skip duplicates option (match by title)
- Field mapping for non-standard columns
- Import preview with validation results
Export
- Export all vulnerabilities as JSON
- Respects current filters (severity, category)
- Useful for sharing across instances or backup
- Full field export including tags and CVEs
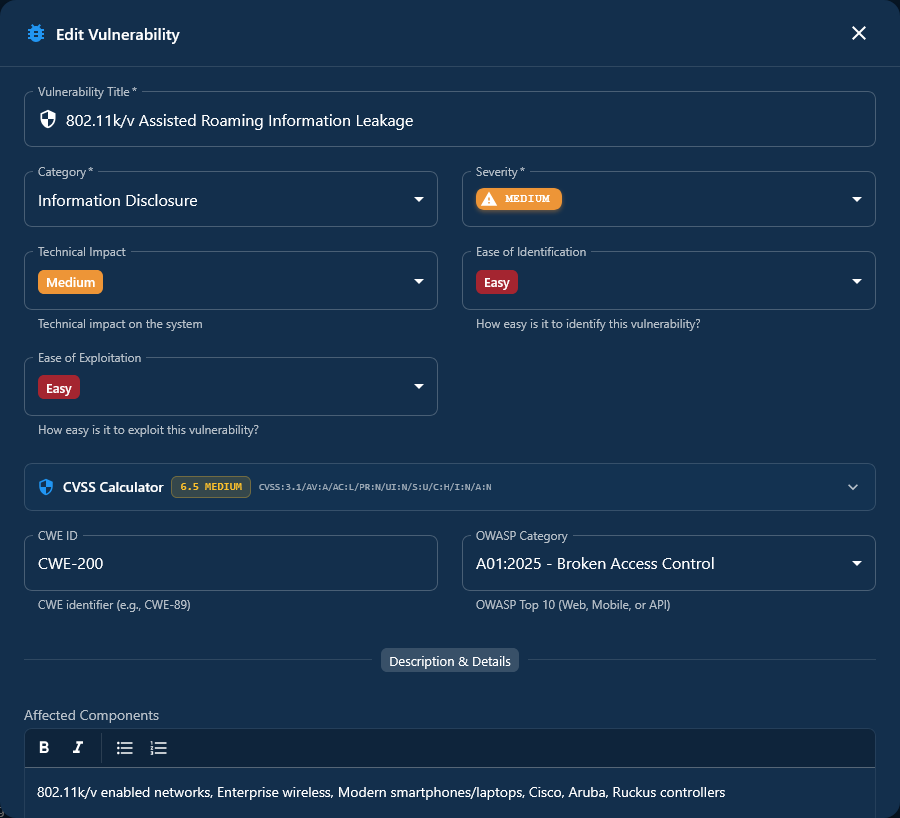
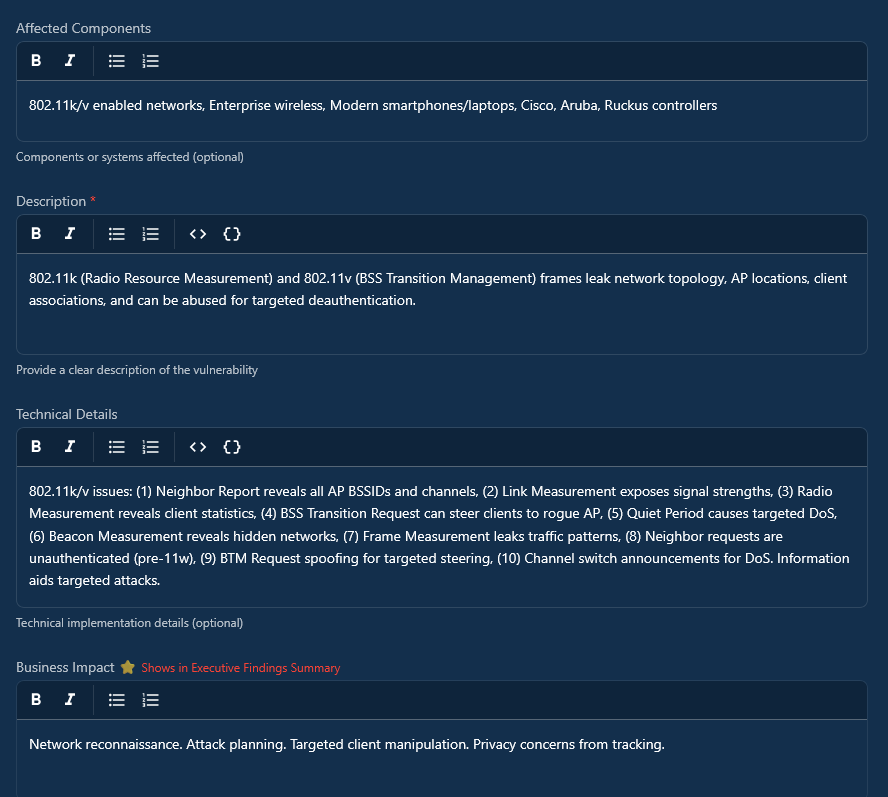
Project Vulnerabilities & PoC Evidence
This is where the real work happens — customizing findings for each engagement and documenting exploitation evidence.
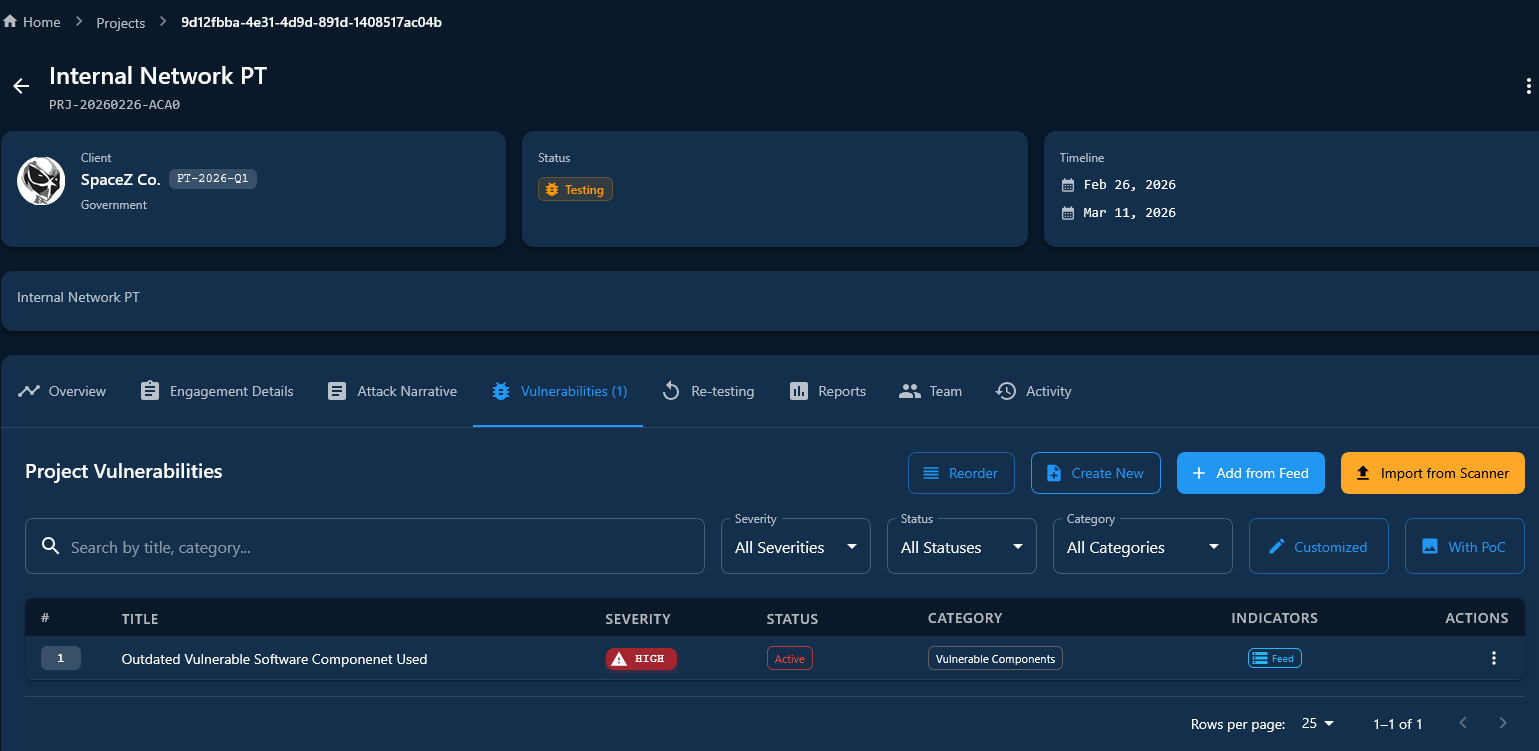
- Open a project → Project Vulnerabilities tab
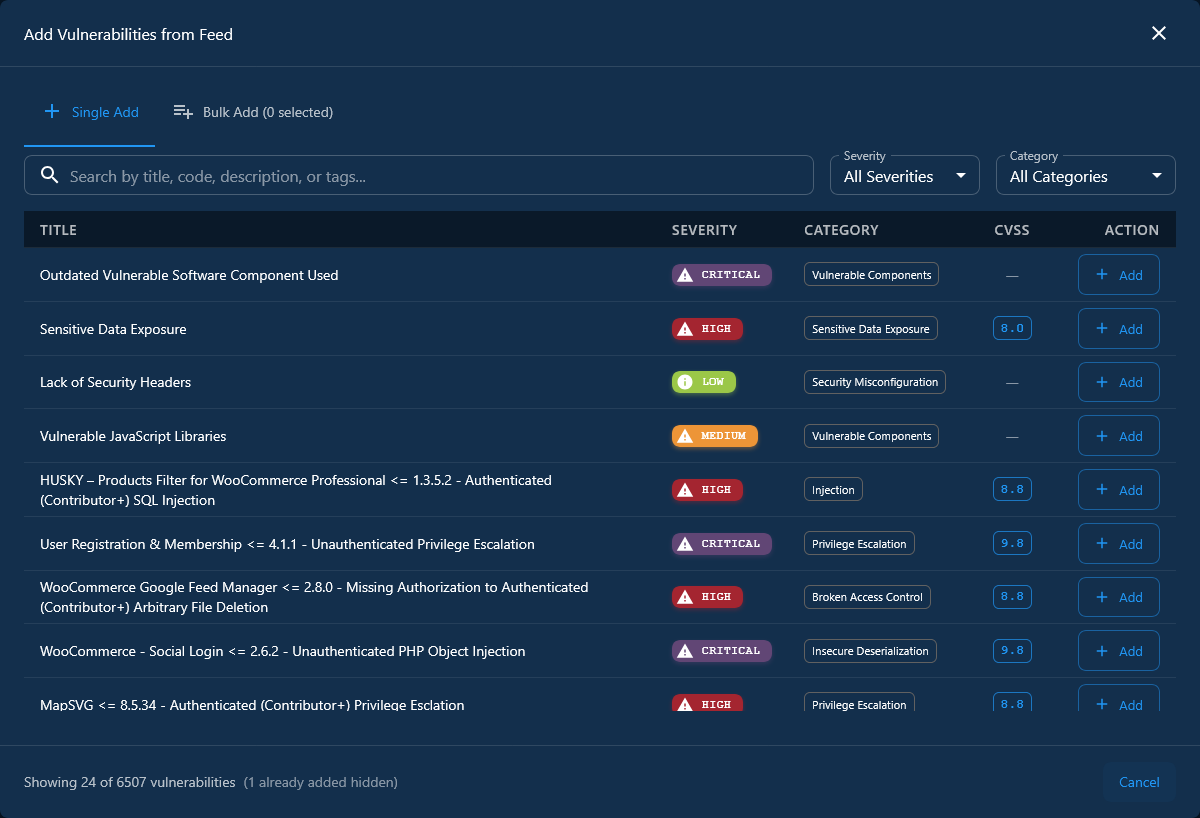
- Click + Add from Feed to browse the global vulnerability database
- Search, filter by severity/category, and multi-select findings
- Click Add Selected — findings are cloned into the project
- Re-order vulnerabilities based on tester preference by drag and drop feature
- The original feed vulnerability is never modified
The below screenshot shows Add From Feed wizard
Compliance Audit Import
Import compliance audit findings directly from Nessus .nessus files with drag-and-drop upload. Sectoria auto-parses compliance results, skips duplicates, and uses AI-powered severity estimation to assign risk levels based on control criticality and regulatory impact. Max file size: 50MB.
Important: This feature is specifically designed for Configuration Review project types. Compliance audit imports are used when assessing system hardening, baseline configurations, and regulatory compliance — distinct from vulnerability-based penetration testing projects. After import, the user can trigger LLM enrichment on all findings or specific ones using your local LLM (Ollama) to generate severity ratings, enhance descriptions, impact, and remediation guidance — all processed on your infrastructure with zero data leaving your network.
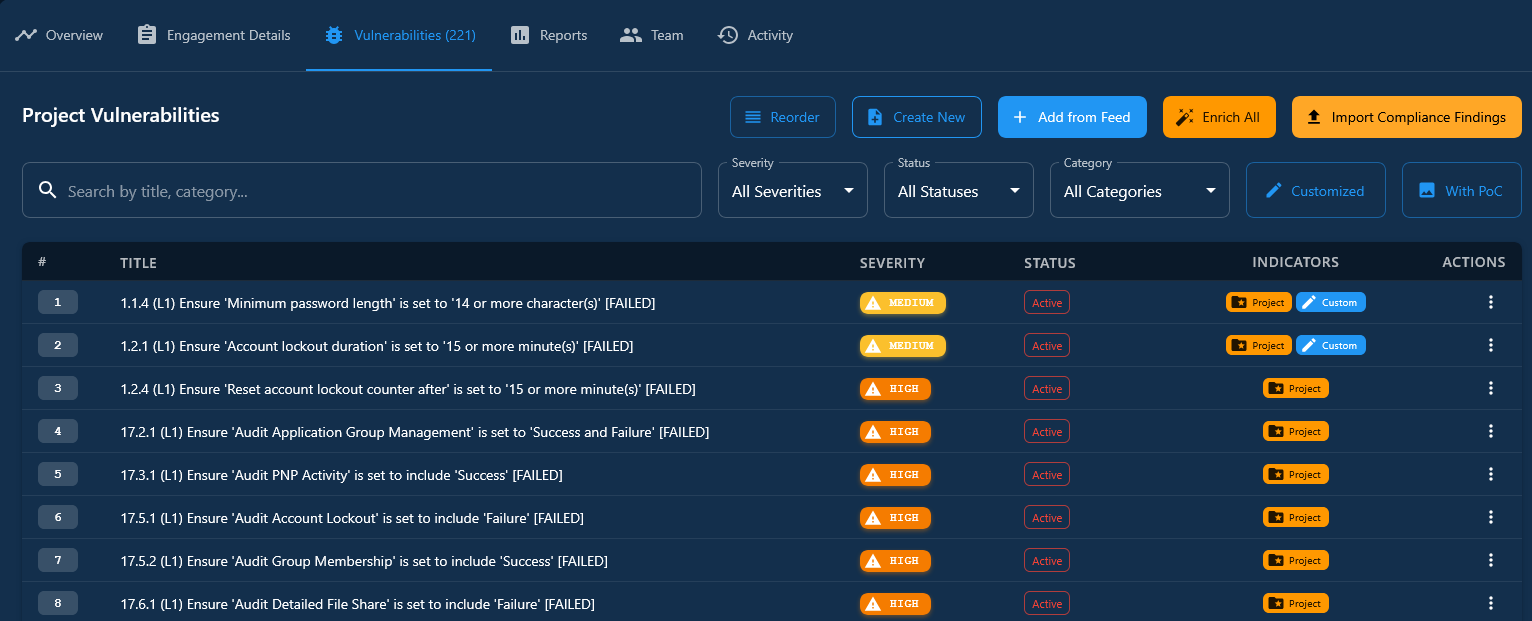
Findings Options
Each project vulnerability can be customized, duplicated, compared with source, and promoted to feed if added manually.
Customize Dialog
Edit title, severity, status, impacts, description, technical details, recommendations, CVSS scoring, and risk assessment fields.
Duplicate Finding
Instantly clone a vulnerability within the project — perfect for documenting multiple instances of the same issue across different endpoints or components, each with its own PoC evidence and tester notes.
Promote to Feed
Created a custom project-level finding? Promote it to the global vulnerability feed with one click, making it available for all future projects. Turns field discoveries into reusable organizational knowledge.
Compare with Source
Side-by-side comparison of customized finding vs. original from global feed with highlighted differences.
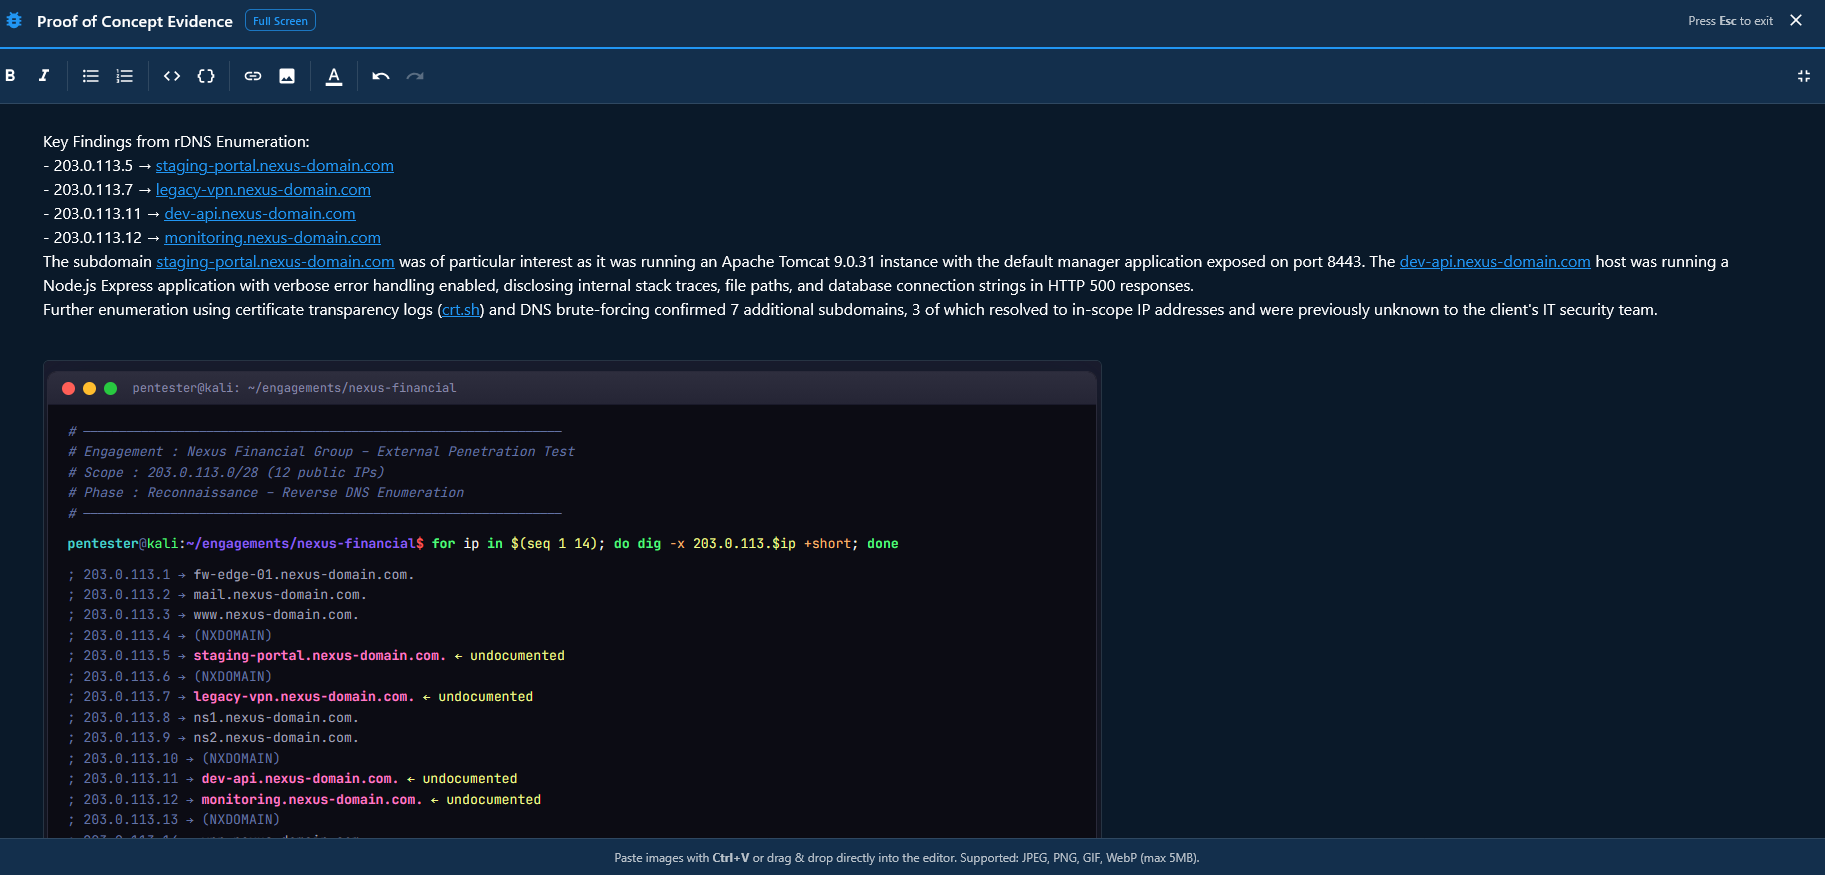
Proof of Concept Evidence Editor
Professional rich text editor powered by Tiptap, purpose-built for documenting exploitation evidence:
- Formatting — Bold, italic, code inline, bullet/numbered lists, code blocks, links
- Image Upload — Drag-and-drop screenshots (JPEG/PNG/GIF/WebP, max 5MB, magic byte validation)
- Real-time preview — Content renders as formatted HTML in reports
- Status tracking — Active, Resolved, Verified, False Positive per finding
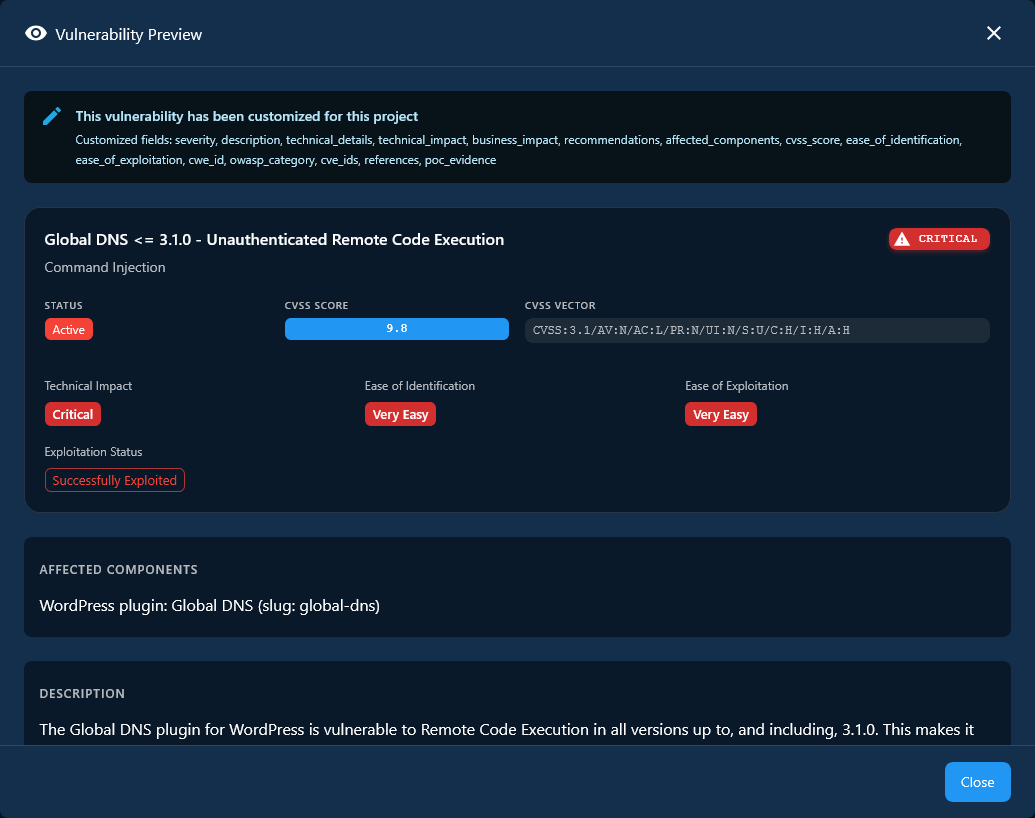
Preview Dialog
Click any vulnerability row for a comprehensive read-only view with all sections: customization alert, basic info, affected components, description, impacts, recommendations, PoC evidence with rendered HTML, and tester notes.
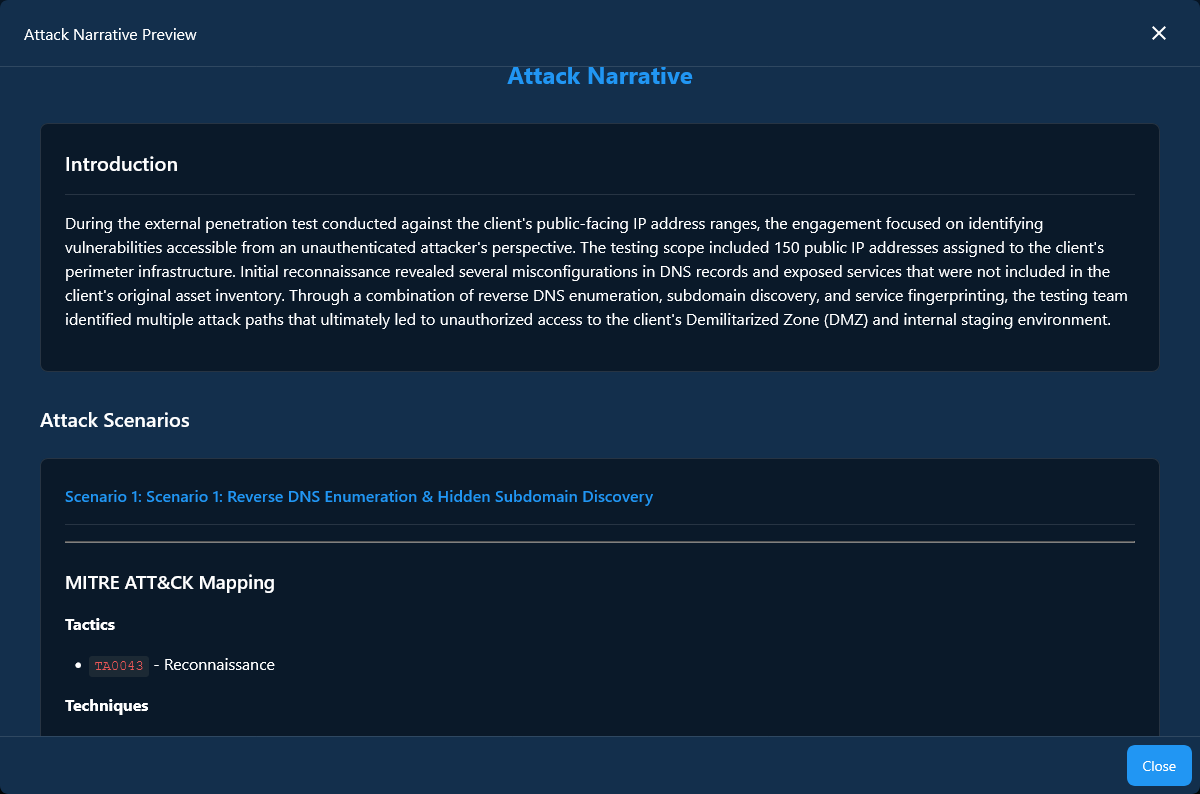
Attack Narrative
The Attack Narrative is an optional project section documenting the testing approach as a story — providing clients with context about how the assessment was conducted best suited for red-teaming and internal penetration testing activities.
- Open a project → Attack Narrative tab
- Write the Introduction using the rich text editor (scope, objectives, approach)
- Click + Add Scenario for each attack path or testing phase
- Give each scenario a title (e.g., "External Reconnaissance", "Web App Testing")
- Upload images per scenario (up to 20, screenshots/diagrams/network maps)
- Drag and drop scenarios to reorder them
- Use Preview to see the formatted output before report generation
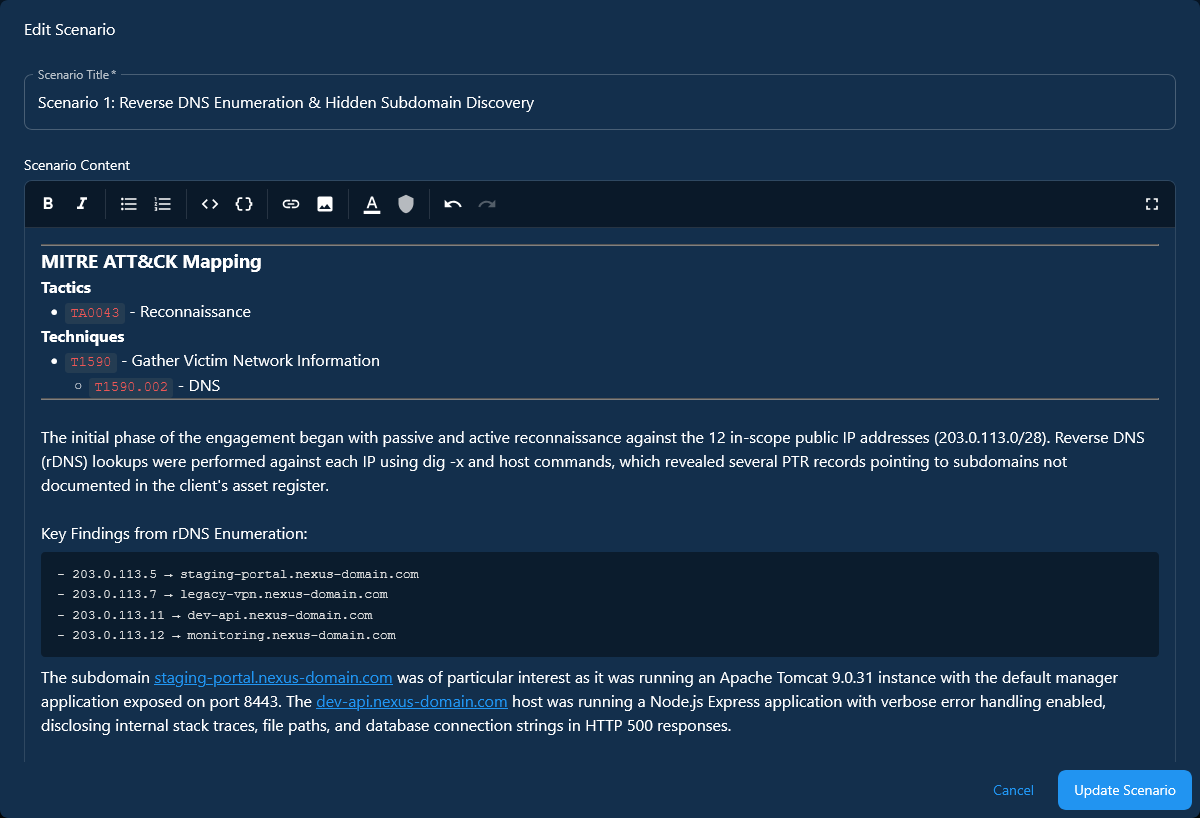
Below showing the Attack Narrative Preview dialog
| Feature | Details |
|---|---|
| Rich text editing | Bold, italic, code blocks, lists, links, embedded images |
| Scenario management | Add, edit, delete, drag-and-drop reorder |
| Image uploads | Up to 10 in introduction, 20 per scenario (5MB each) |
| Collaboration | Comments section for team discussion |
| Version tracking | Changes tracked with timestamps |
Report Generation
Report generation is Sectoria's flagship feature — transforming project data into polished, client-ready deliverables with a 3-step wizard.
DOCX
Microsoft Word with full template formatting, client logo, auto-TOC, and severity-colored tables.
HTML
Web-based with dark/light theme. 3-4x faster generation, 50% smaller files, self-contained.
Via LibreOffice (from DOCX) or WeasyPrint (from HTML). Print-ready with proper page breaks.
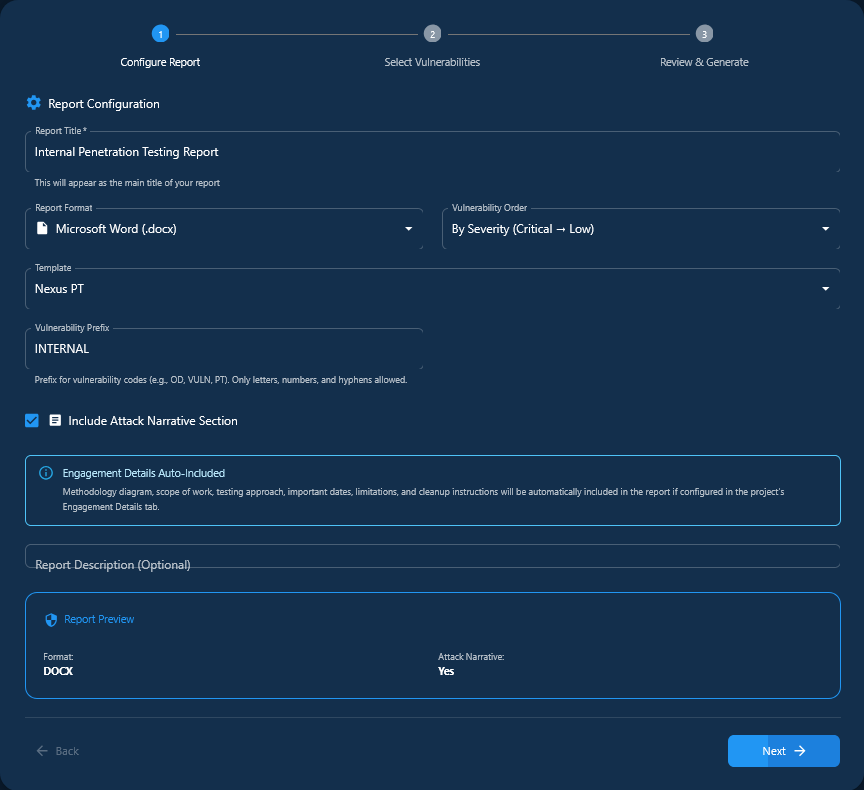
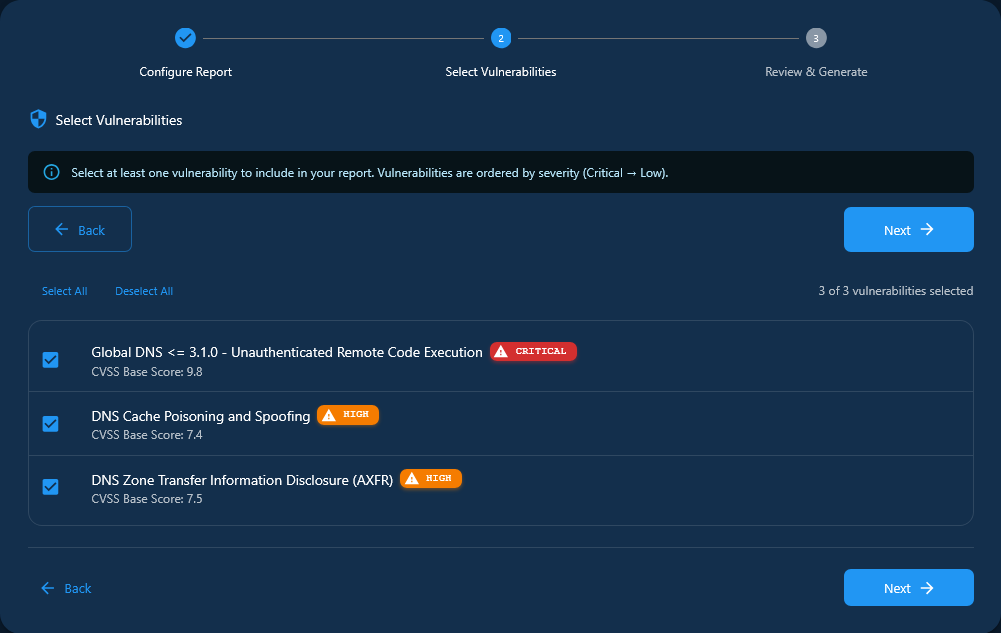
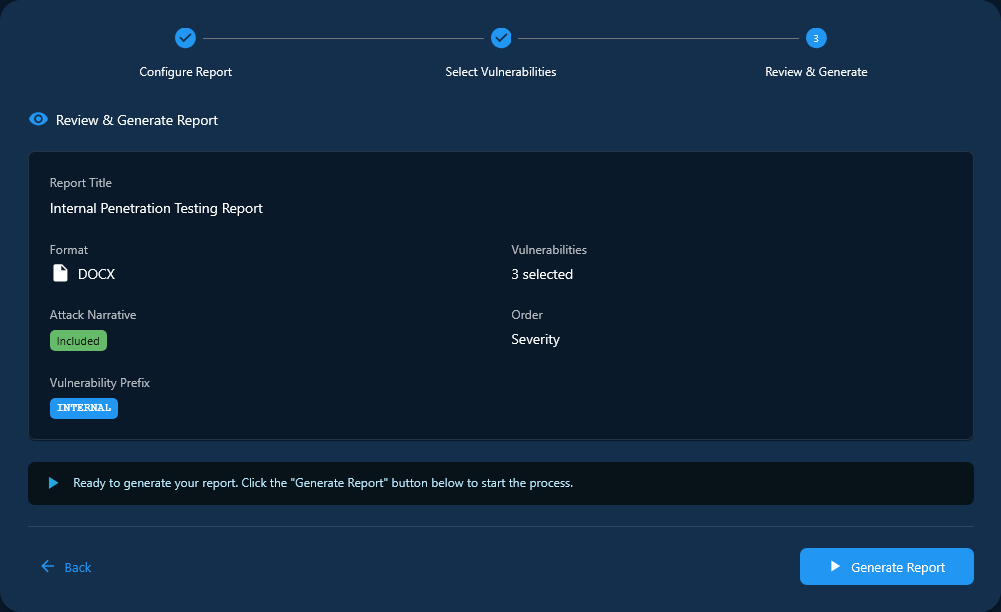
3-Step Report Generation Wizard
- Enter Report Title (e.g., "Q1 2026 Penetration Testing Report")
- Select a Template from client's uploaded Word templates
- Choose Format: DOCX / HTML / PDF
- Toggle Include Attack Narrative
- Set Vulnerability Prefix (e.g., "VULN", "PT", "SEC") for finding codes
- Multi-select findings with severity badges and status chips
- Filter by severity, status, or category
- Choose ordering: by Severity, CVSS Score, or Custom
- Review configuration summary (title, template, format, vulnerability count)
- Click Generate Report — progress indicator shows status
- Click Download when complete
Immutable Snapshots
Key Feature: Every generated report creates an immutable snapshot of all project data. You can regenerate the exact same report months later, even if underlying data has changed. Critical for audit compliance and client disputes.
Report Content Structure
| # | Section | Description |
|---|---|---|
| 1 | Cover Page | Client logo, project name, date, team lead, version |
| 2 | Table of Contents | Auto-generated with page numbers |
| 3 | Executive Summary | High-level overview of findings |
| 4 | Vulnerability Summary Table | All findings with severity, CVSS, status |
| 5 | Attack Narrative (optional) | Introduction and scenarios with embedded images |
| 6 | Vulnerability Details | Per-finding: code, description, impact, recommendations, PoC |
Template System
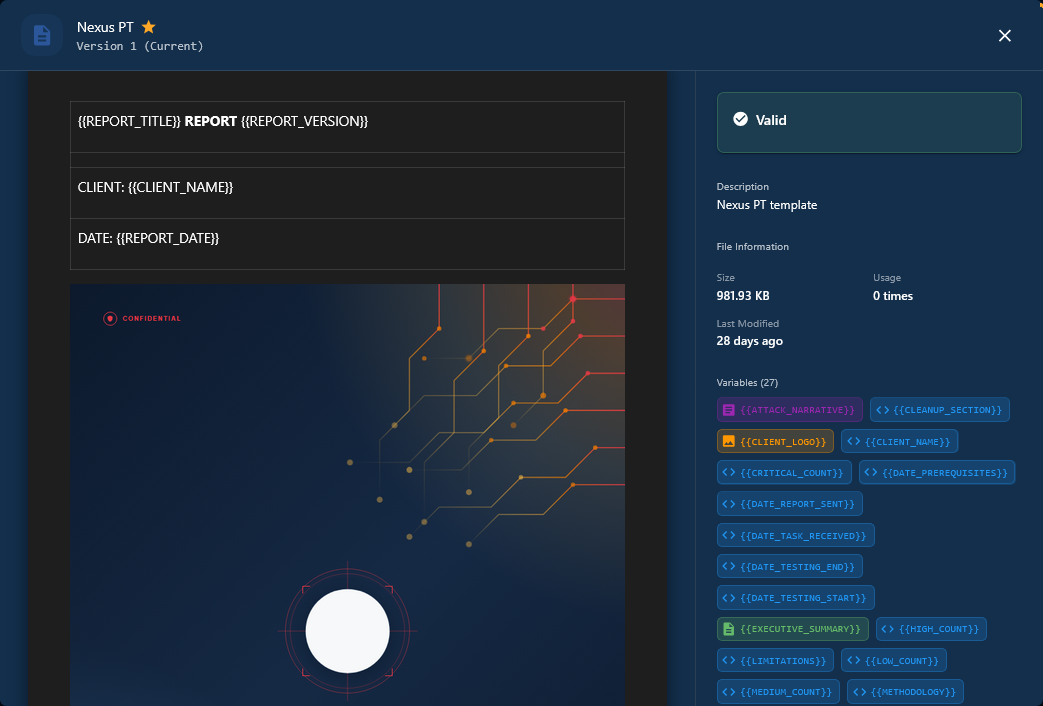
Upload client-specific Word templates with placeholders like {{client_name}}, {{vulnerabilities_section}}, {{attack_narrative}}. Sectoria auto-detects and validates all placeholders on upload.
Re-testing & Remediation Tracking
Track vulnerability remediation and verify fixes with a dedicated re-testing workflow consisting of 5 re-test rounds (max) and report generation.
Retest Recording
Record Pass/Fail/Not Tested status per vulnerability with tester comments and timestamps.
Retest Report
Generate dedicated retest reports with severity-based statistics, color-coded results, and trend analysis.
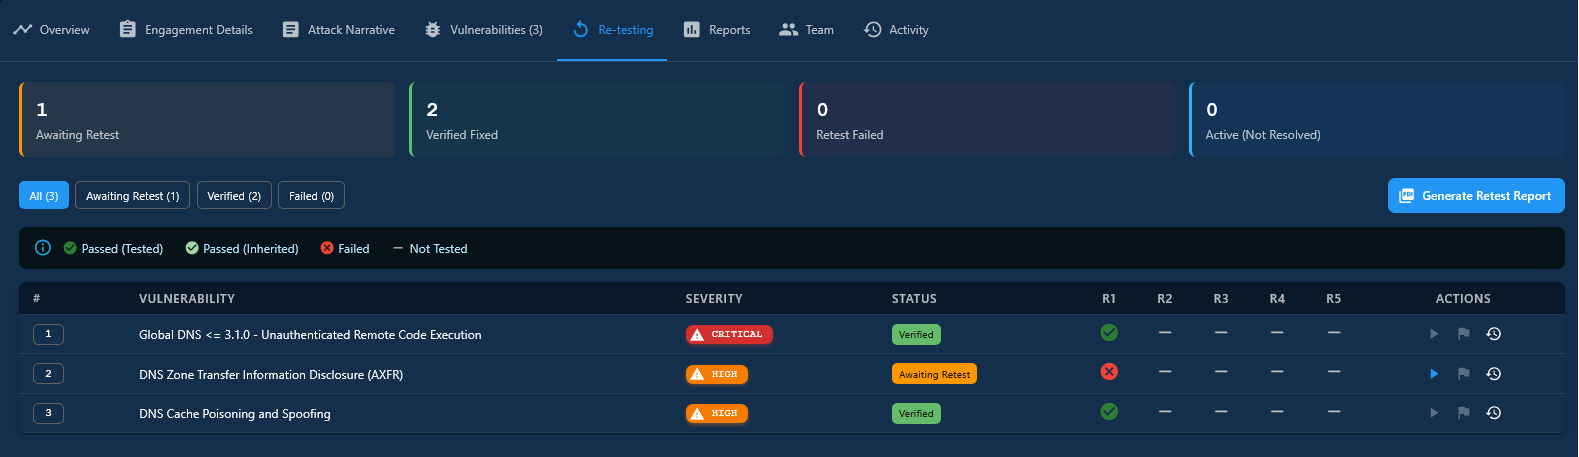
Notice second vulnerability in above screenshot with 'Failed' status which needs a second round of re-test
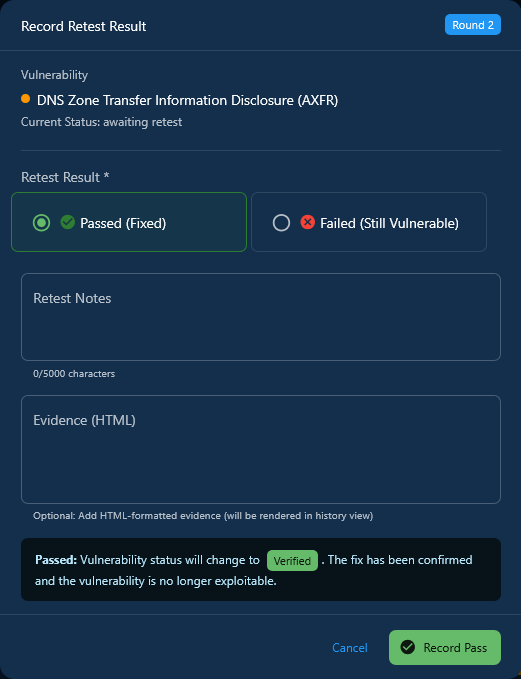
Now all vulnerabilities are passed, we can generate re-test report

Team Assignment & Access Control
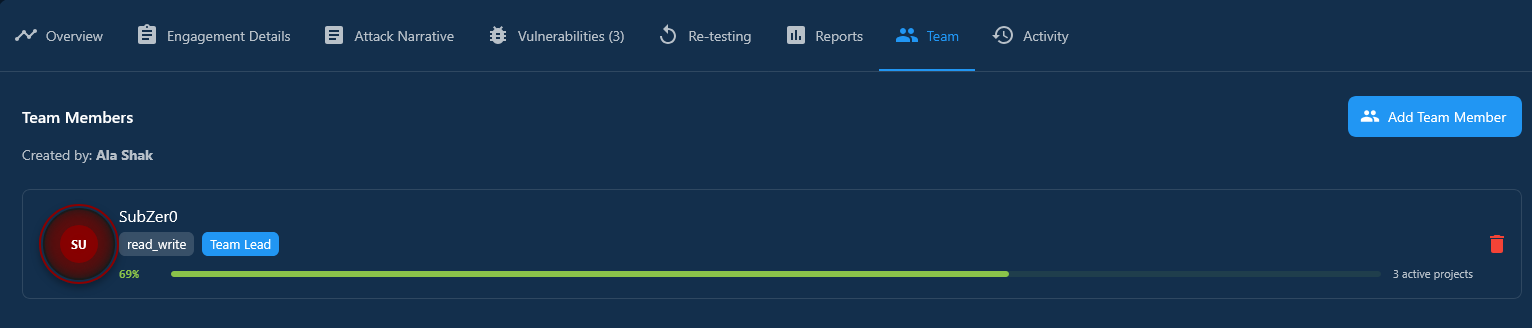
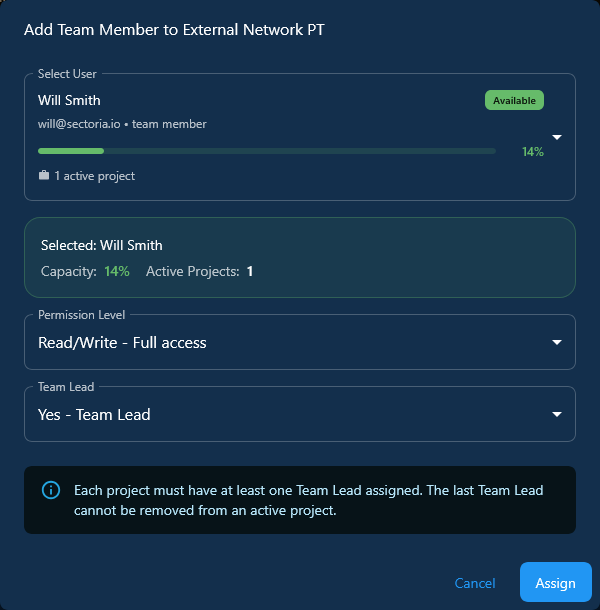
Assign team members to projects right after creating new project with granular permission levels, capacity-aware selection, and real-time notifications on every change.
Three Permission Levels
Read/Write — full access to all project content. Read-Only — view only, cannot modify or generate reports. Reviewer — view and comment, approve changes.
Team Lead Designation
Promote any member to Team Lead with a toggle. Team Leads automatically get Read/Write access. Every active project must have at least one Team Lead.
Capacity-Aware Assignment
User selection dropdown sorted by workload utilization. Color-coded capacity bars (green/yellow/red) and active project counts help prevent over-assigning team members.
Real-Time Notifications
Instant WebSocket notifications on assignment, removal, and permission changes. Email notifications sent in parallel. Full audit trail for every team operation.
A user can be READ_WRITE + Team Lead or READ_WRITE + Regular Member, but cannot be READ_ONLY + Team Lead. The Team Lead flag adds organizational authority (can't be removed from active projects, every project must have at least one), while the permission level controls content access. Additionally, user permissions are structured on 2 levels: system level and project level. A team member (not team lead) on system level can be assigned as a Team Lead on a specific project and vice versa.
Activity Tracking
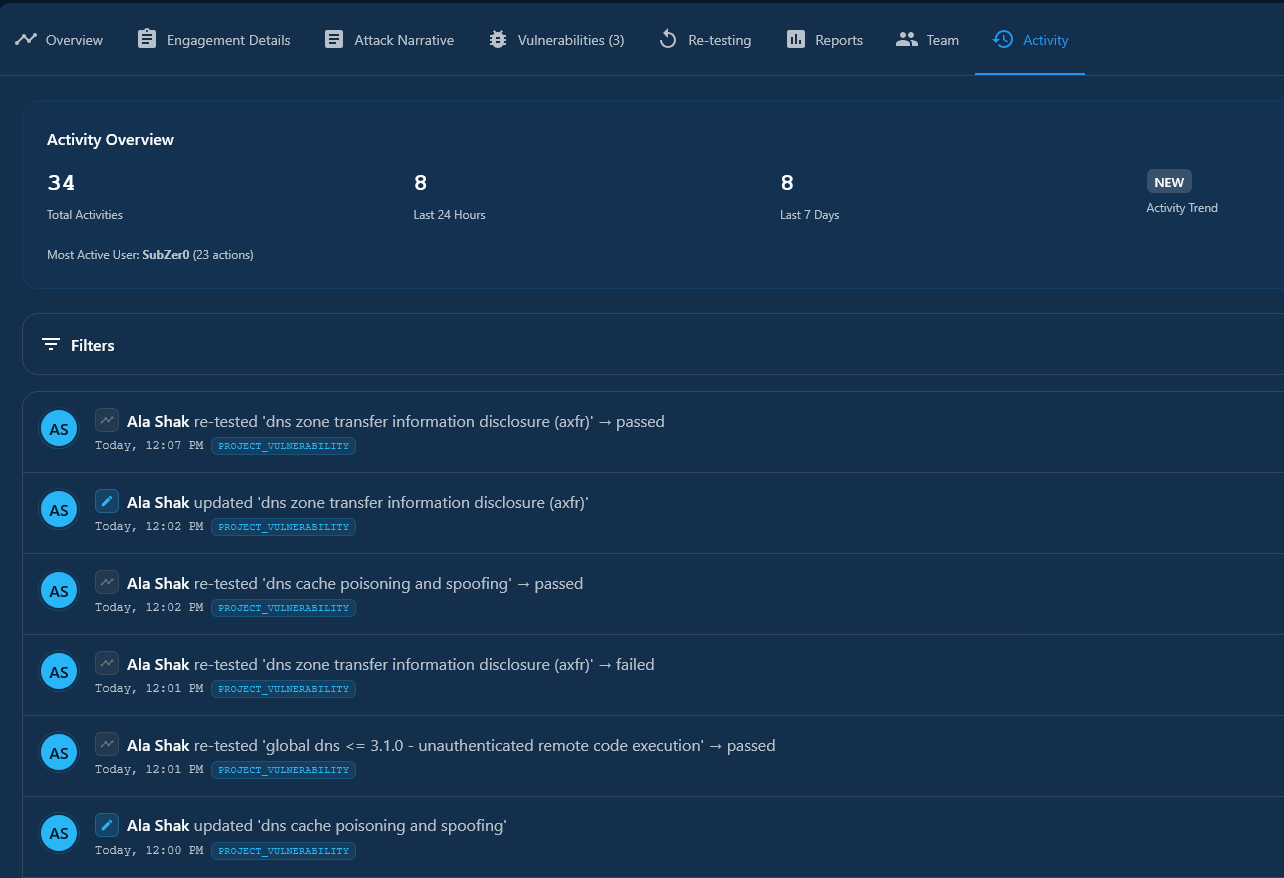
Complete audit trail with 113 tracked action types across authentication, project management, vulnerabilities, reports, and collaboration — all updated in real-time via WebSocket.
Live Activity Feed
Real-time project activity stream with color-coded action icons, user avatars, and relative timestamps adjusted to each user's timezone. Infinite scroll pagination.
Activity Statistics
Dashboard showing total activities, last 24h/7d counts, trend analysis (increasing/decreasing/stable), most active user, and most common action type.
Advanced Filtering
Filter by action type (project, vulnerability, report, comment), user, status (success/failure/error), and date range. Collapsible filter panel with active filter count.
Rich Action Messages
Intelligent message generation: "Added 'SQL Injection' to project", "Re-tested 'XSS Stored' → PASSED", "Changed status: Planning → In Progress".
Team Collaboration
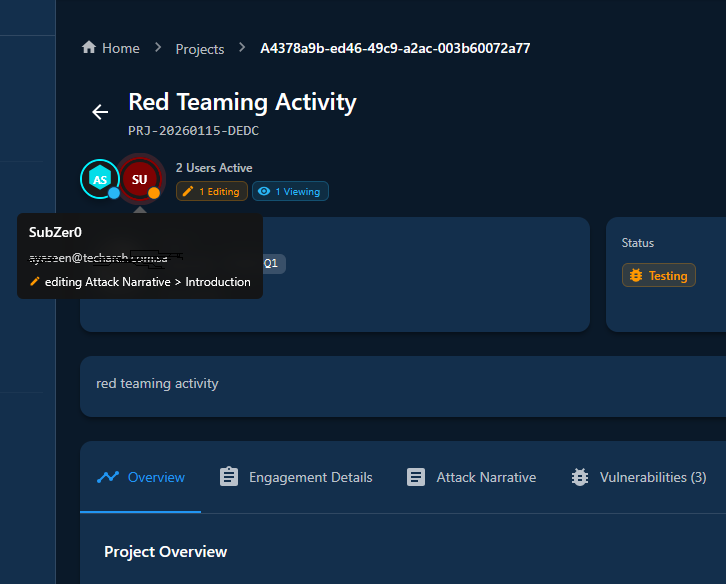
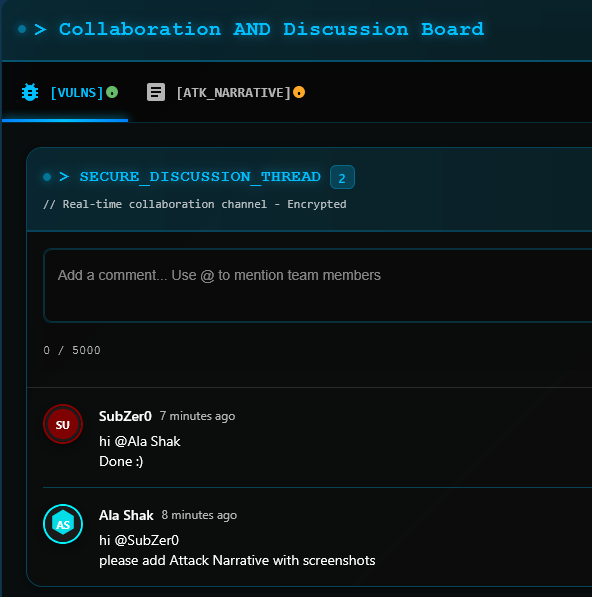
Real-time collaboration features keep your team synchronized via WebSocket-powered communication.
Real-Time Presence
See who's viewing or editing each project section. Auto idle detection after 2 minutes.
Comments & @Mentions
Tabbed discussion (Overview, Vulnerabilities, Narrative). @mentions trigger instant notifications.
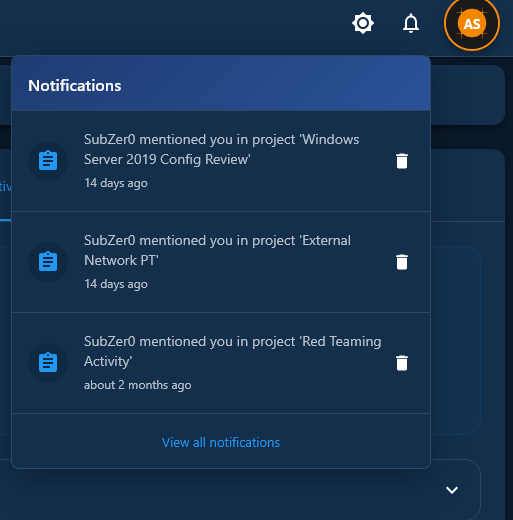
Notifications
Team assignments, permission changes, report completions, comment mentions — all in real-time.
Scanner Integration
Sectoria features a Universal XML Parser — a configuration-driven engine that can parse any scanner's output without hardcoded logic. Built with enterprise security and extensibility at its core.
Universal Configuration-Driven Parser
No hardcoded parsing logic. Scanner configurations are defined as JSON field mappings — add a new scanner by creating a config file, no code changes required.
Secure XML Processing
Uses defusedxml library to prevent XXE attacks, XML bombs (billion laughs), and DTD retrieval. File size validation (50MB max), extension whitelist, and magic byte validation.
Memory-Efficient Streaming
Generator-based parsing pattern processes findings one at a time — handles large scan files (10,000+ findings) without loading everything into memory.
Admin-Customizable Configurations
Two-tier config registry: built-in defaults (JSON files) overridden by admin database configurations. Customize field mappings per scanner without touching code.
- Open a project → Project Vulnerabilities → Click Import
- Upload your
.nessusfile - Sectoria auto-detects scanner format, parses vulnerabilities with CVSS & CVEs, normalizes severity, deduplicates
- Review import preview with validation results → Click Import
| Scanner | Format | Features |
|---|---|---|
| Nessus | .nessus (XML) | Vulnerability + Compliance audit parsing, CVE extraction, CVSS derivation |
| Qualys VM | XML | Vulnerability management scan parsing with QID mapping |
| Qualys WAS | XML | Web application scan parsing |
| Qualys PC | XML | Policy compliance scan parsing |
| Burp Suite | XML | Planned — add via JSON configuration |
| Nmap | XML | Planned — add via JSON configuration |
| OWASP ZAP | XML/JSON | Planned — add via JSON configuration |
Architecture
| Component | Role |
|---|---|
| UniversalParser | Configuration-driven XML parser — extracts raw values using field mappings defined in JSON |
| ConfigurationRegistry | Two-tier config lookup: admin database overrides → built-in JSON defaults. Auto-detection via XML structure patterns |
| ImportAdapter | Transforms parsed findings into project vulnerabilities with deduplication, severity normalization, and OWASP category mapping |
| Security Layer | defusedxml for XXE/bomb prevention, input sanitization, field length limits (50K chars), output XSS prevention |
| BaseParser | Abstract interface using Template Method pattern — defines the parsing lifecycle for all scanner implementations |
Adding a New Scanner: Create a JSON configuration file defining the XML element paths, field mappings, and transformations. Register it in the config directory or upload via the Admin Settings UI. No Python code changes needed — the Universal Parser handles the rest.
AI-Powered Enrichment
Leverage local or cloud-based LLMs to enhance vulnerability descriptions, generate remediation guidance, and map findings to compliance frameworks.
| Capability | Description |
|---|---|
| Compliance Severity Estimation | Automatically estimate severity ratings for compliance audit findings based on control criticality, regulatory impact, and organizational risk context |
| Description Enhancement | Transform sparse scanner output into comprehensive, audit-ready findings |
| Remediation Guidance | Generate actionable remediation steps tailored to the specific finding |
| Compliance Mapping | Map findings to CIS, NIST, PCI-DSS, ISO 27001 frameworks |
| Impact Analysis | Generate technical and business impact assessments |
Privacy: With Ollama (local LLM), all processing happens on your infrastructure. No data leaves your network. Cloud LLM (OpenAI) is optional and can be toggled off at any time.
Custom Methodologies
Design and manage testing methodologies with a visual canvas editor supporting all penetration testing categories. Default methodologies are seeded in Sectoria out of the box, ready to use from day one.
Visual Canvas Editor
Drag-and-drop phase design with arrow connections. Auto-generates SVG diagrams for documentation and reports.
All Categories
Web App, Mobile, Network, API, Cloud, Wireless, Active Directory, Social Engineering, Physical, IoT/ICS, Red Team, Code Review, and more.
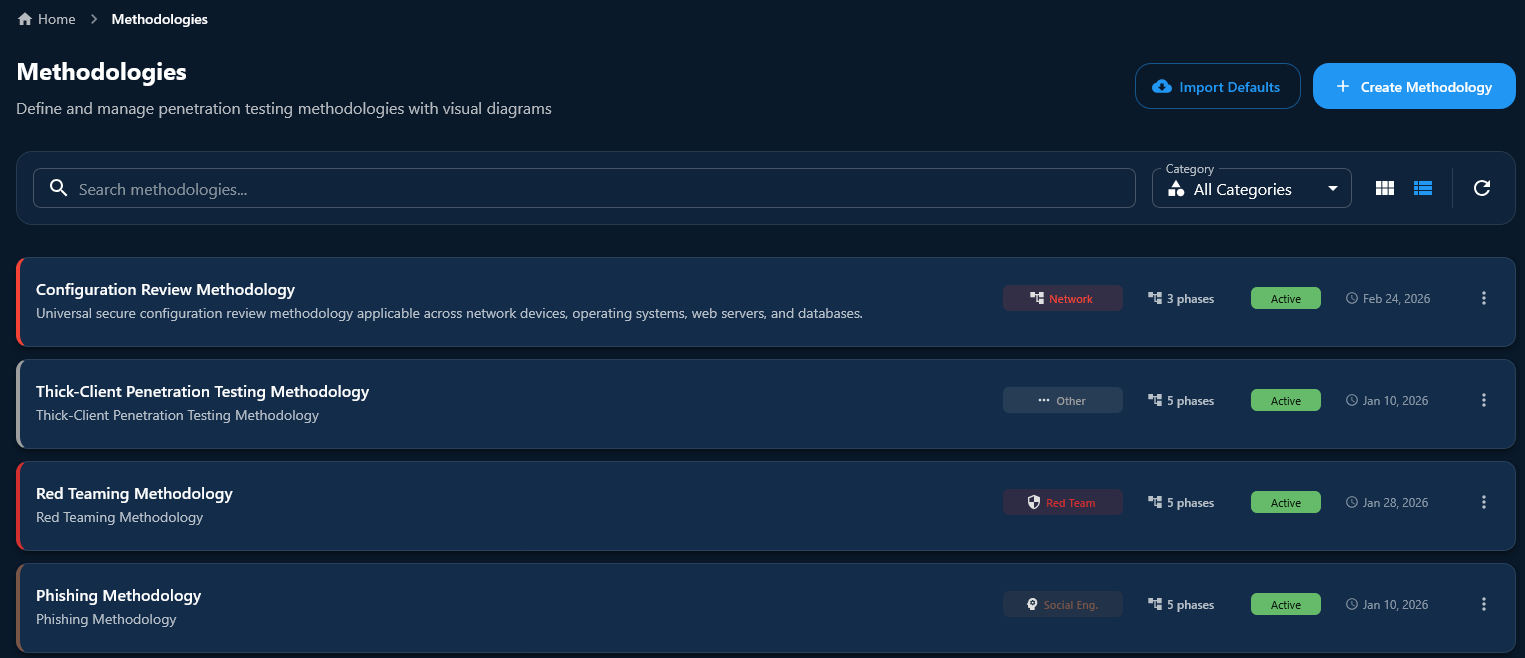
Editing and viewing Configuration Review Methodology

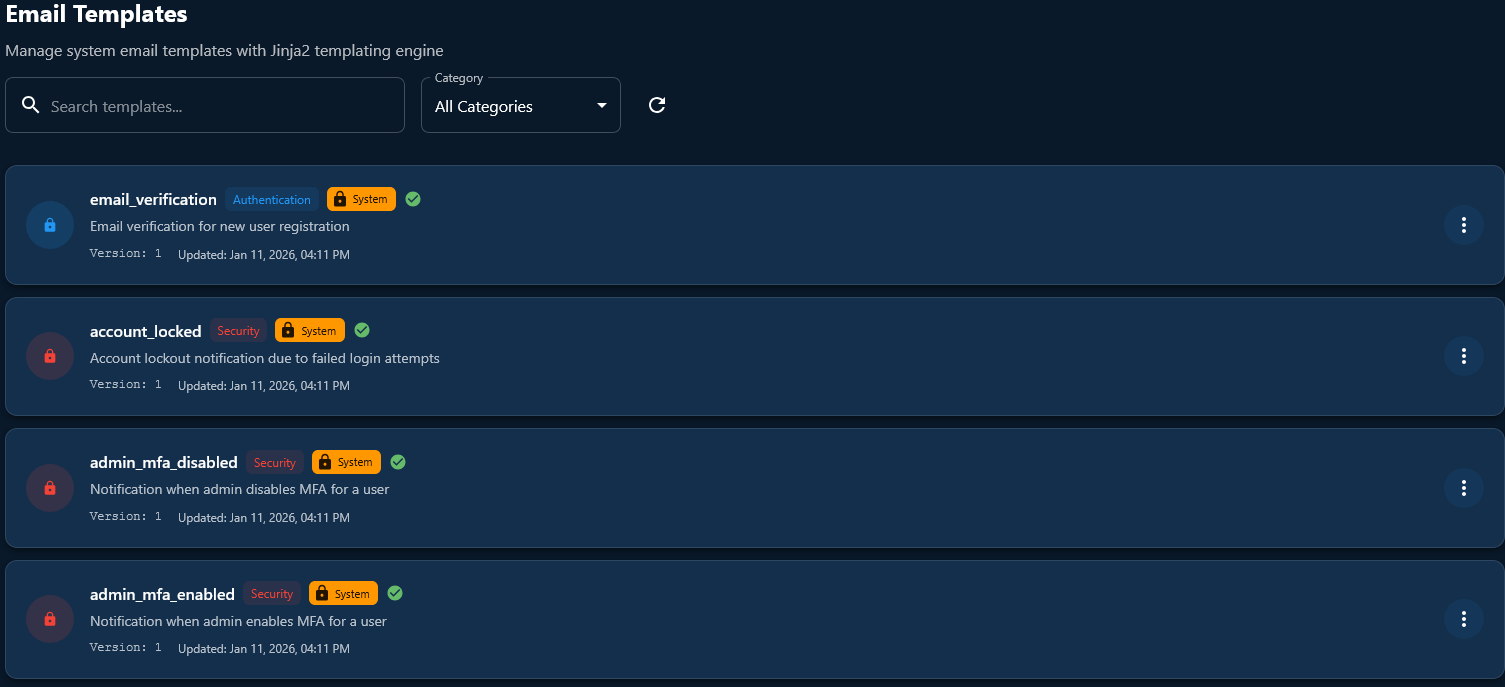
Email Notifications
Complete transactional email system with customizable templates across 5 categories: Authentication, Security, Notification, Report, and System.
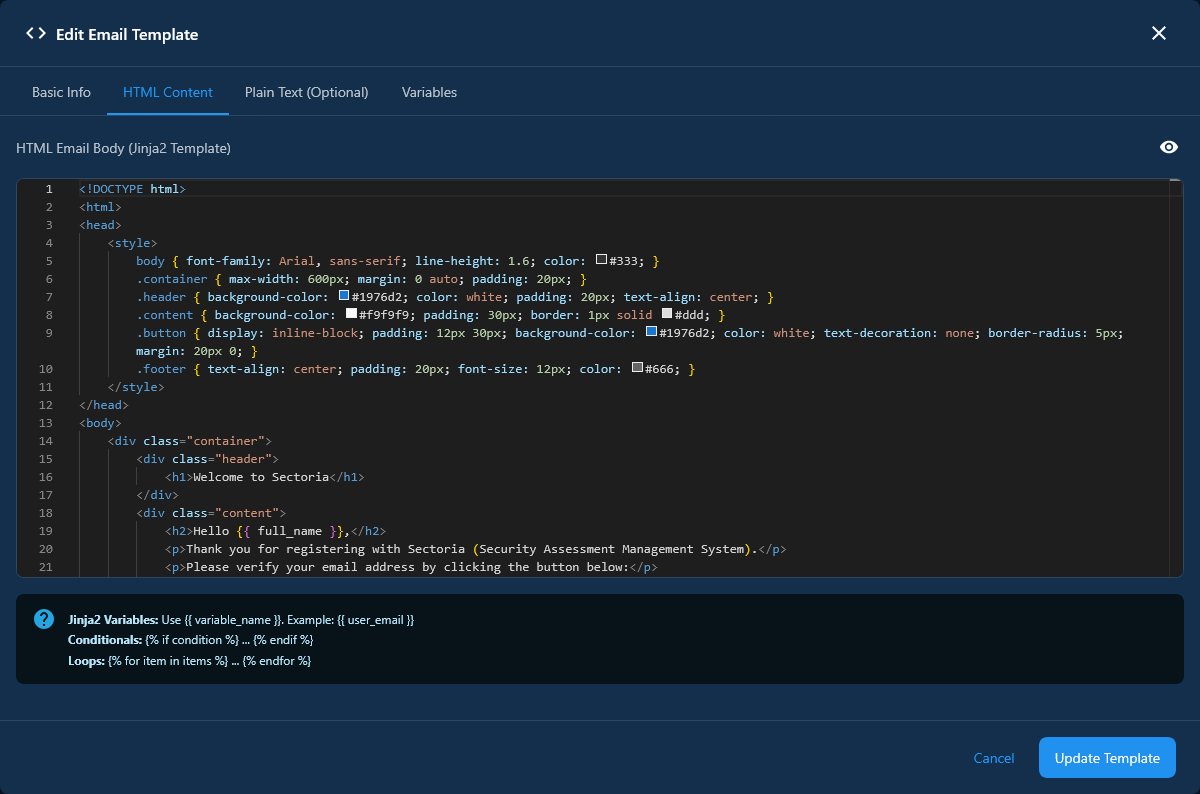
- Rich HTML editor for template customization with variable insertion (e.g.,
{{user_name}}) - Preview & test send before deploying changes
- Reset to default if customizations don't work out
- SMTP configuration with TLS and encrypted credential storage
Administration & Settings
Comprehensive configuration across 8 settings tabs with role-based visibility.
| Tab | Access | Key Settings |
|---|---|---|
| General | All users | Profile, theme (Light/Dark/System), personal timezone (55 zones) |
| Preferences | Admin | Global timezone, application URL for email links, SMTP configuration, work schedule & weekend days configuration for business day calculations |
| Report Configuration | Admin | Filename patterns with variables, severity color customization |
| Storage & Backup | Admin/TL | Storage quotas, usage breakdown, cleanup |
| LLM & AI | Admin | Provider selection (Ollama/OpenAI), model config, connection test |
| Security | Admin | Session timeout (15-480min), lockout, MFA enforcement, IP whitelisting |
| Scanners & Parsers | Admin | Scanner integration configuration, field mapping |
| System Administration | Admin | License management, device migration, system upgrades |
System Upgrades (Air-Gap Support)
Upload .sup upgrade packages with RSA-SHA256 digital signature verification, SHA-256 checksums, version compatibility checking, and 7-step tar validation. Rollback option available if issues detected. No internet required.
Security & Compliance
Built with security as a first-class concern, designed and continuously tested by cybersecurity professionals.
Authentication & Access
bcrypt password hashing with salt
RFC 7519 JWT with 9-point validation
TOTP MFA (Google Authenticator, Authy)
RBAC with 40+ granular permissions
Redis-backed token revocation blacklist
Data Protection
TLS 1.3 + Fernet (AES-128) encryption
File upload: whitelist + MIME + magic bytes
SQLAlchemy ORM (parameterized queries)
DOMPurify + Jinja2 auto-escaping (XSS)
SSRF prevention (private IP / metadata blocking)
Comprehensive Audit Trail
Every action logged with: User ID, action type (113 types), resource affected, timestamp (UTC), client IP, user agent, status, and JSON details. Supports SOC2, ISO 27001, GDPR compliance requirements.
CVSS Scoring
Full support for CVSS v3.0, v3.1, and v4.0 vector strings with base, temporal, and environmental scores. Built-in CVSS calculator in vulnerability customization for accurate risk assessment.
MITRE ATT&CK Mapping
Map findings to MITRE ATT&CK technique IDs (e.g., T1190, T1059.001) with a dedicated selector component. Available in both global vulnerability feed and per-project vulnerability customization.
OWASP Standards Integration
Findings mapped to: OWASP Web Top 10 (2025), OWASP Web Top 10 (2021), OWASP Mobile Top 10 (2024), and OWASP API Security Top 10 (2023) with links to official documentation.
Deployment Options
Sectoria is 100% self-hosted — your data never leaves your infrastructure.
On-Premise
Physical servers in your data center. Maximum control for regulated industries.
Private Cloud
AWS, Azure, GCP private instances. Scalability with cloud infrastructure.
Virtual Machines
VMware, Hyper-V, VirtualBox. Flexible resource allocation.
Air-Gapped
No internet connectivity required. Deploy and upgrade offline for classified environments.
Infrastructure Requirements
| Component | Minimum | Recommended |
|---|---|---|
| CPU | 2 cores | 4+ cores |
| RAM | 4 GB | 8+ GB |
| Storage | 50 GB | 100+ GB |
| OS | Ubuntu 22.04+ | Ubuntu 24.04 LTS |
| Docker | 20.10+ | Latest stable |
Container Architecture
| Container | Purpose |
|---|---|
sectoria-frontend | React web application (Nginx) |
sectoria-backend | FastAPI application server |
sectoria-postgres | PostgreSQL database |
sectoria-redis | Redis cache and session store |
Supports Docker Compose for single-node and Docker Swarm for high-availability clusters.
Screenshot Checklist
Use this checklist to capture all screenshots needed for the final document. 56 screenshots total.
Ready to transform your security assessment workflow?
Schedule a demo to see Sectoria in action.